> ## Documentation Index
> Fetch the complete documentation index at: https://xrlive.mintlify.site/llms.txt
> Use this file to discover all available pages before exploring further.
# Wire Action Controller
> Connect each declared control to Blueprint logic using Find Control by Name and Assign On Slider Value
With the controls declared in `UICategories`, the next step is to connect them to Blueprint logic inside `BP_Settings`. This module covers how the connection pattern works and walks through wiring the two slider controls — **Horizontal move** and **Vertical move** — to the Cube's transform.
The checkbox, color picker, and dropdown controls follow the same base pattern described here. Their specific wiring will be covered in dedicated modules as they are built.
***
## How the connection pattern works
Every operator control is wired with the same three-step structure inside the EventGraph of `BP_Settings`:
Get a reference to the `xrlive_UIpanel` component and call **Find Control by Name**, passing the exact name of the control as declared in `UICategories`. Internally, this node searches the control array and returns a Widget Controller Object Reference for that specific control.
From the **Return Value** of `Find Control by Name`, call the assign node that matches the control type — for sliders this is **Assign On Slider Value**. Connect a custom event to its **Event** pin. This registers the custom event as the handler that runs every time the operator moves the slider.
Inside the custom event, use the **Value Modification** output pin (a float carrying the current slider position) to drive the target property — in this case the Cube's relative location on the corresponding axis.
`Find Control by Name` returns a generic Widget Controller reference. The assign nodes (**Assign On Slider Value**, **Assign On Checkbox Value**, etc.) are methods on that reference specific to each control type. You will only see the correct assign node when the control type matches.
***
## Step 1 — Wire the Horizontal Move slider
Open `BP_Settings` and go to the **EventGraph** tab.
### 1.1 — Call Find Control by Name
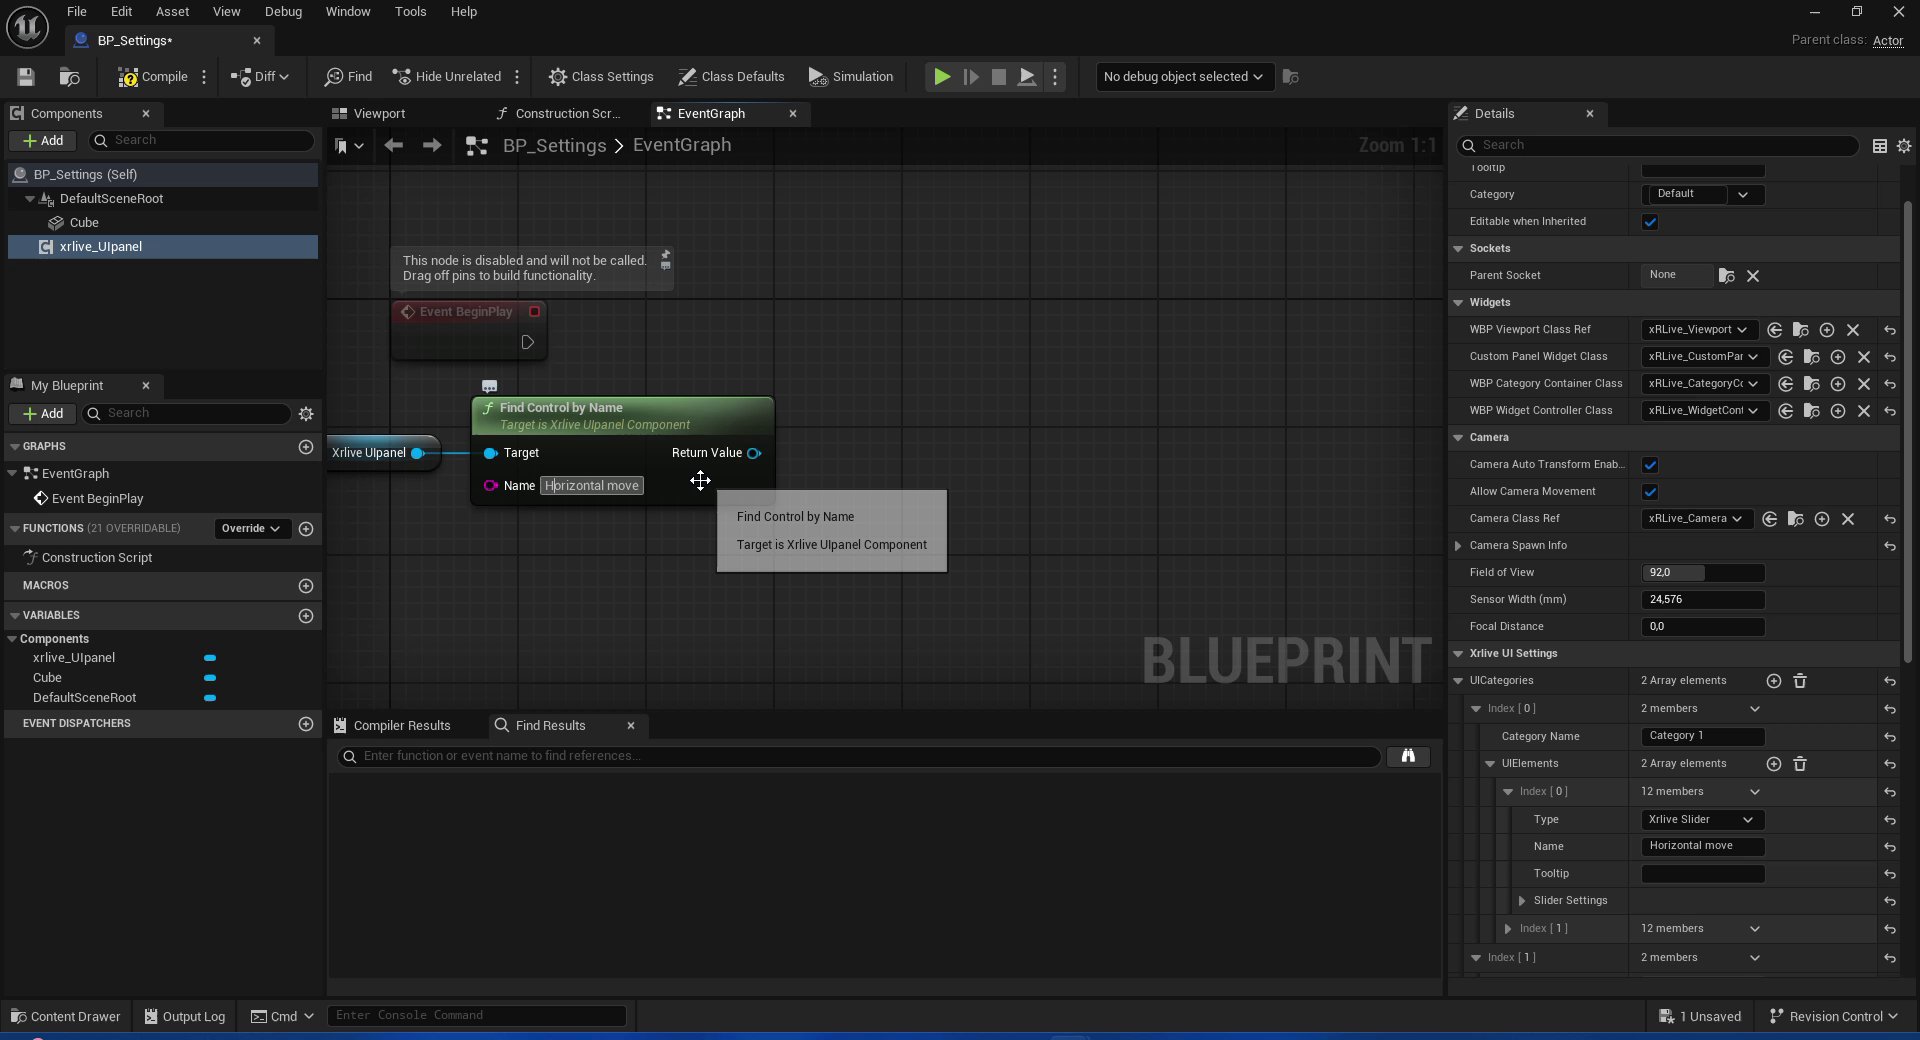
In the Components panel, drag the **xrlive\_UIpanel** component into the EventGraph to create a reference node. Drag off its output pin, search for **Find Control by Name**, and select it.
In the **Name** field of the node, type the control name exactly as declared — `Horizontal move`.
 ### 1.2 — Bind the slider event
Drag off the **Return Value** pin of `Find Control by Name` and search for **Assign On Slider Value**. Select it. This creates both the bind node and a connected **Custom Event** node automatically.
Rename the custom event to something descriptive — for example, `OnSliderValue_HorizontalMove`.
### 1.2 — Bind the slider event
Drag off the **Return Value** pin of `Find Control by Name` and search for **Assign On Slider Value**. Select it. This creates both the bind node and a connected **Custom Event** node automatically.
Rename the custom event to something descriptive — for example, `OnSliderValue_HorizontalMove`.
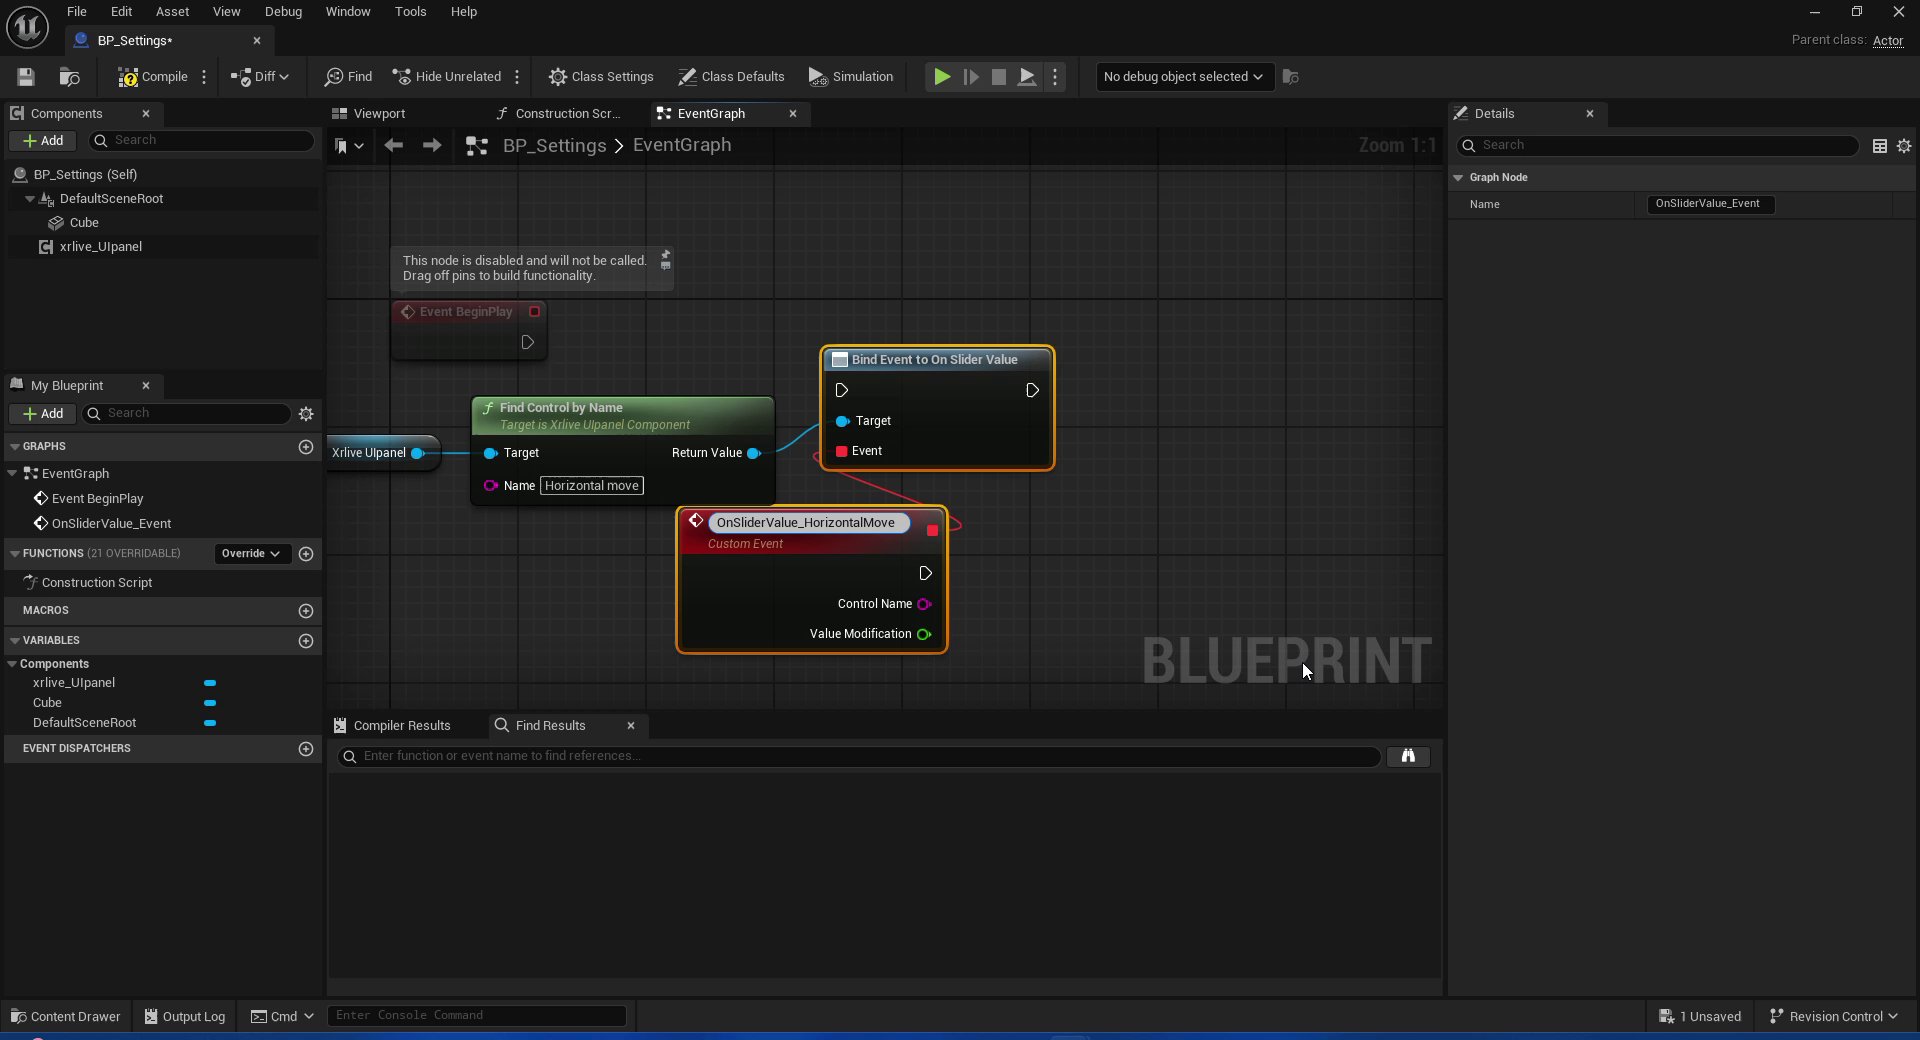 The custom event exposes two output pins:
* **Control Name** — the string identifier of the control that triggered the event
* **Value Modification** — the current float value of the slider (between Min Value and Max Value as set in UICategories)
### 1.3 — Drive the Cube's X position
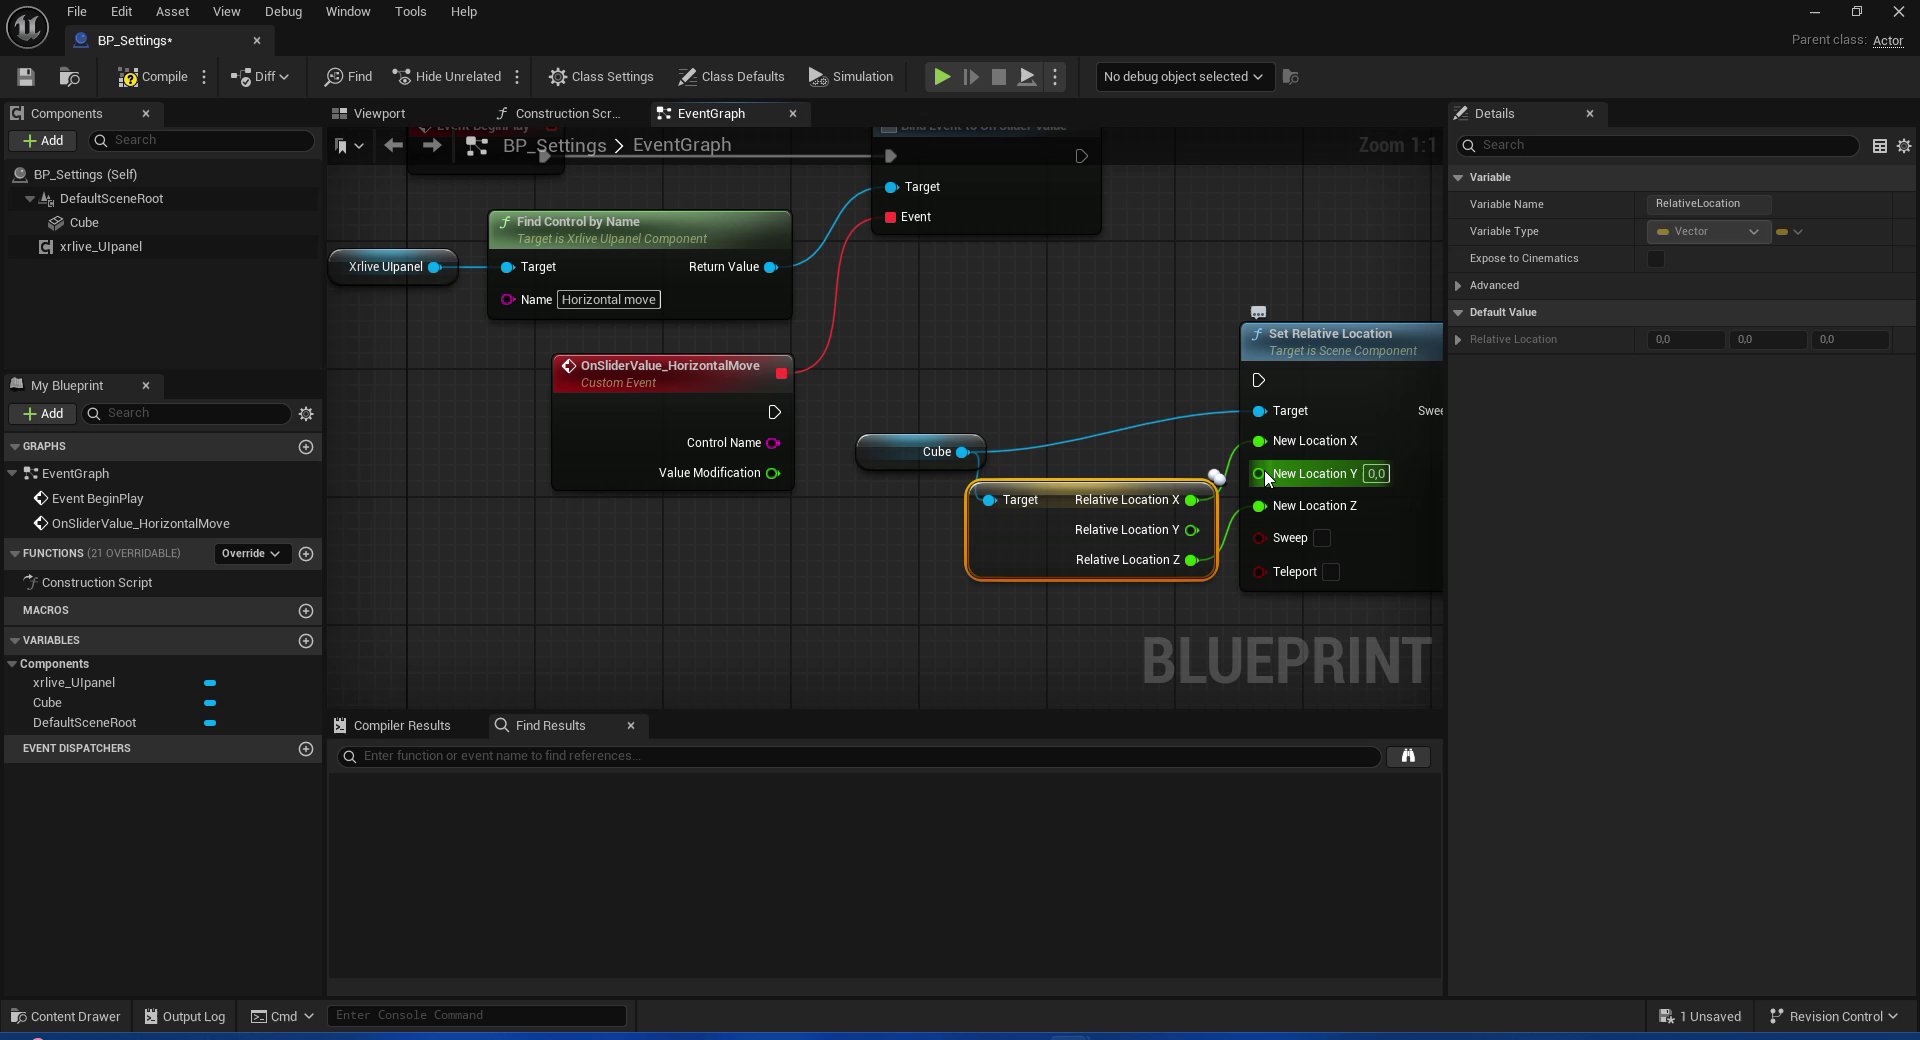
Drag the **Cube** component from the Components panel into the EventGraph. Drag off its output pin and search for **Set Relative Location**.
Right-click the **New Location** pin of `Set Relative Location` and choose **Split Struct Pin** — this exposes X, Y, and Z as individual float inputs.
Connect **Value Modification** from the custom event to **New Location X**.
To preserve the current Y and Z positions when only X changes, drag the **Cube** component again, call **Get Relative Location**, split that struct as well, and connect **Relative Location Y** → **New Location Y** and **Relative Location Z** → **New Location Z**.
The custom event exposes two output pins:
* **Control Name** — the string identifier of the control that triggered the event
* **Value Modification** — the current float value of the slider (between Min Value and Max Value as set in UICategories)
### 1.3 — Drive the Cube's X position
Drag the **Cube** component from the Components panel into the EventGraph. Drag off its output pin and search for **Set Relative Location**.
Right-click the **New Location** pin of `Set Relative Location` and choose **Split Struct Pin** — this exposes X, Y, and Z as individual float inputs.
Connect **Value Modification** from the custom event to **New Location X**.
To preserve the current Y and Z positions when only X changes, drag the **Cube** component again, call **Get Relative Location**, split that struct as well, and connect **Relative Location Y** → **New Location Y** and **Relative Location Z** → **New Location Z**.
 ***
## Step 2 — Wire the Vertical Move slider
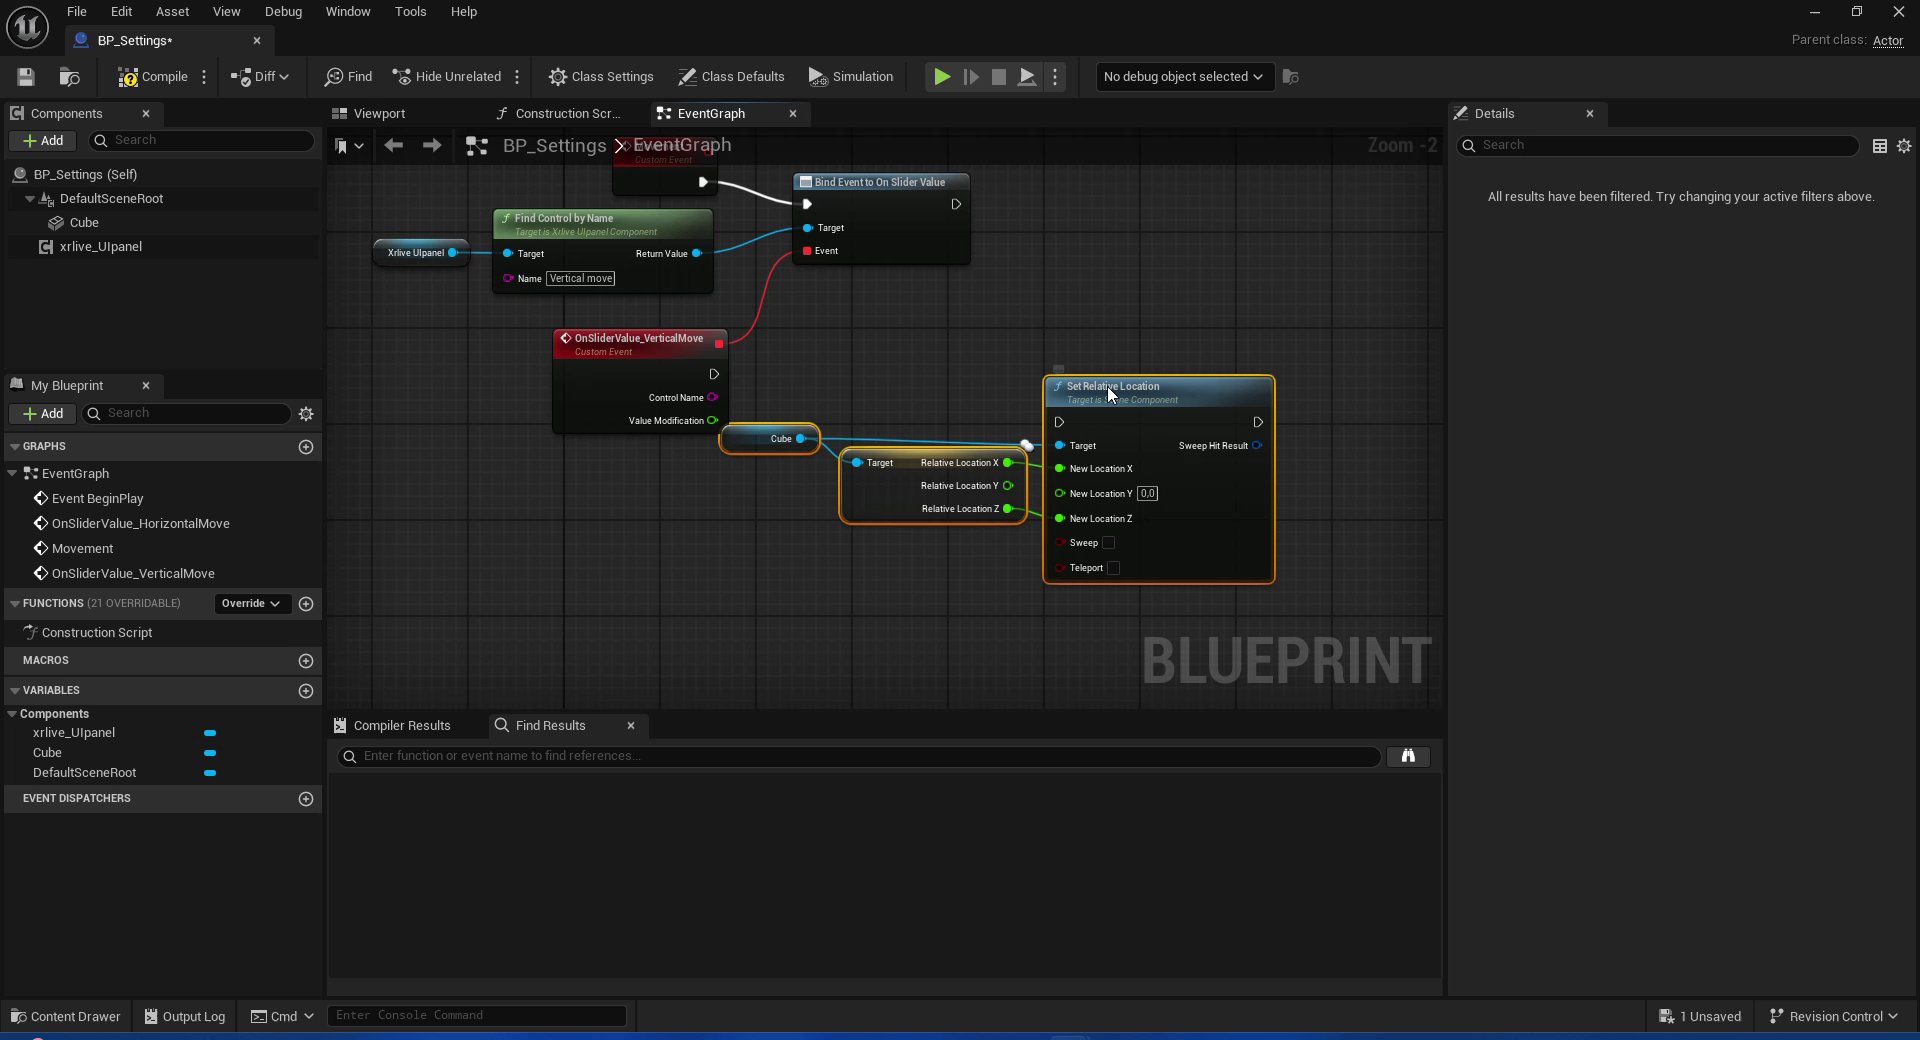
The Vertical Move slider follows the exact same pattern, with two differences: the control name is `Vertical move` and the value drives **New Location Y** instead of X.
### 2.1 — Add a second Find Control by Name
Drag `xrlive_UIpanel` into the EventGraph again. Call **Find Control by Name** and set the Name to `Vertical move`.
### 2.2 — Bind Assign On Slider Value
Drag off **Return Value** and search for **Assign On Slider Value**. When the context menu appears, select **Assign On Slider Value** from the Events section.
***
## Step 2 — Wire the Vertical Move slider
The Vertical Move slider follows the exact same pattern, with two differences: the control name is `Vertical move` and the value drives **New Location Y** instead of X.
### 2.1 — Add a second Find Control by Name
Drag `xrlive_UIpanel` into the EventGraph again. Call **Find Control by Name** and set the Name to `Vertical move`.
### 2.2 — Bind Assign On Slider Value
Drag off **Return Value** and search for **Assign On Slider Value**. When the context menu appears, select **Assign On Slider Value** from the Events section.
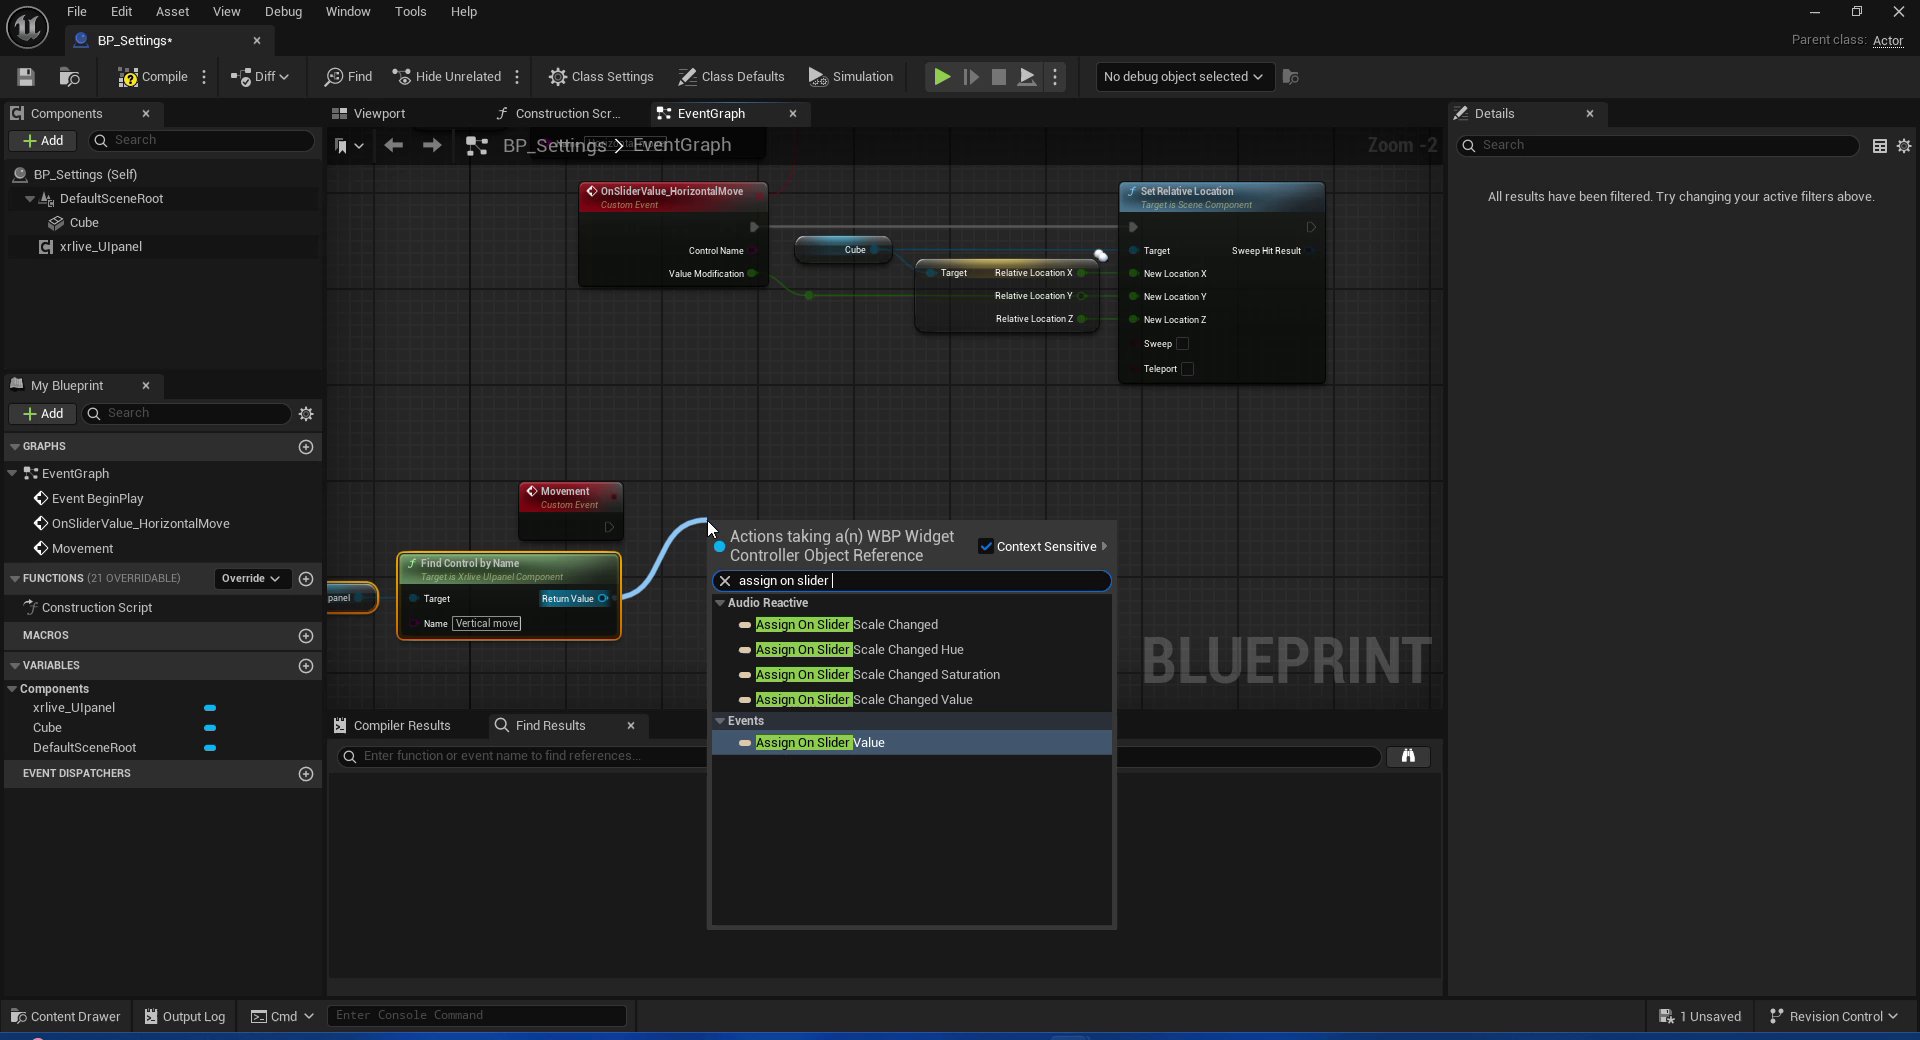 Rename the custom event to `OnSliderValue_VerticalMove`.
### 2.3 — Drive the Cube's Y position
Repeat the `Set Relative Location` setup: split the struct, connect **Value Modification** → **New Location Y**, and preserve X and Z from the current relative location.
Rename the custom event to `OnSliderValue_VerticalMove`.
### 2.3 — Drive the Cube's Y position
Repeat the `Set Relative Location` setup: split the struct, connect **Value Modification** → **New Location Y**, and preserve X and Z from the current relative location.
 ***
## Step 3 — Wire the Visibility checkbox
The checkbox uses the same base pattern — `Find Control by Name` → bind node → custom event — but the assign node and output pins differ from sliders.
### 3.1 — Call Find Control by Name
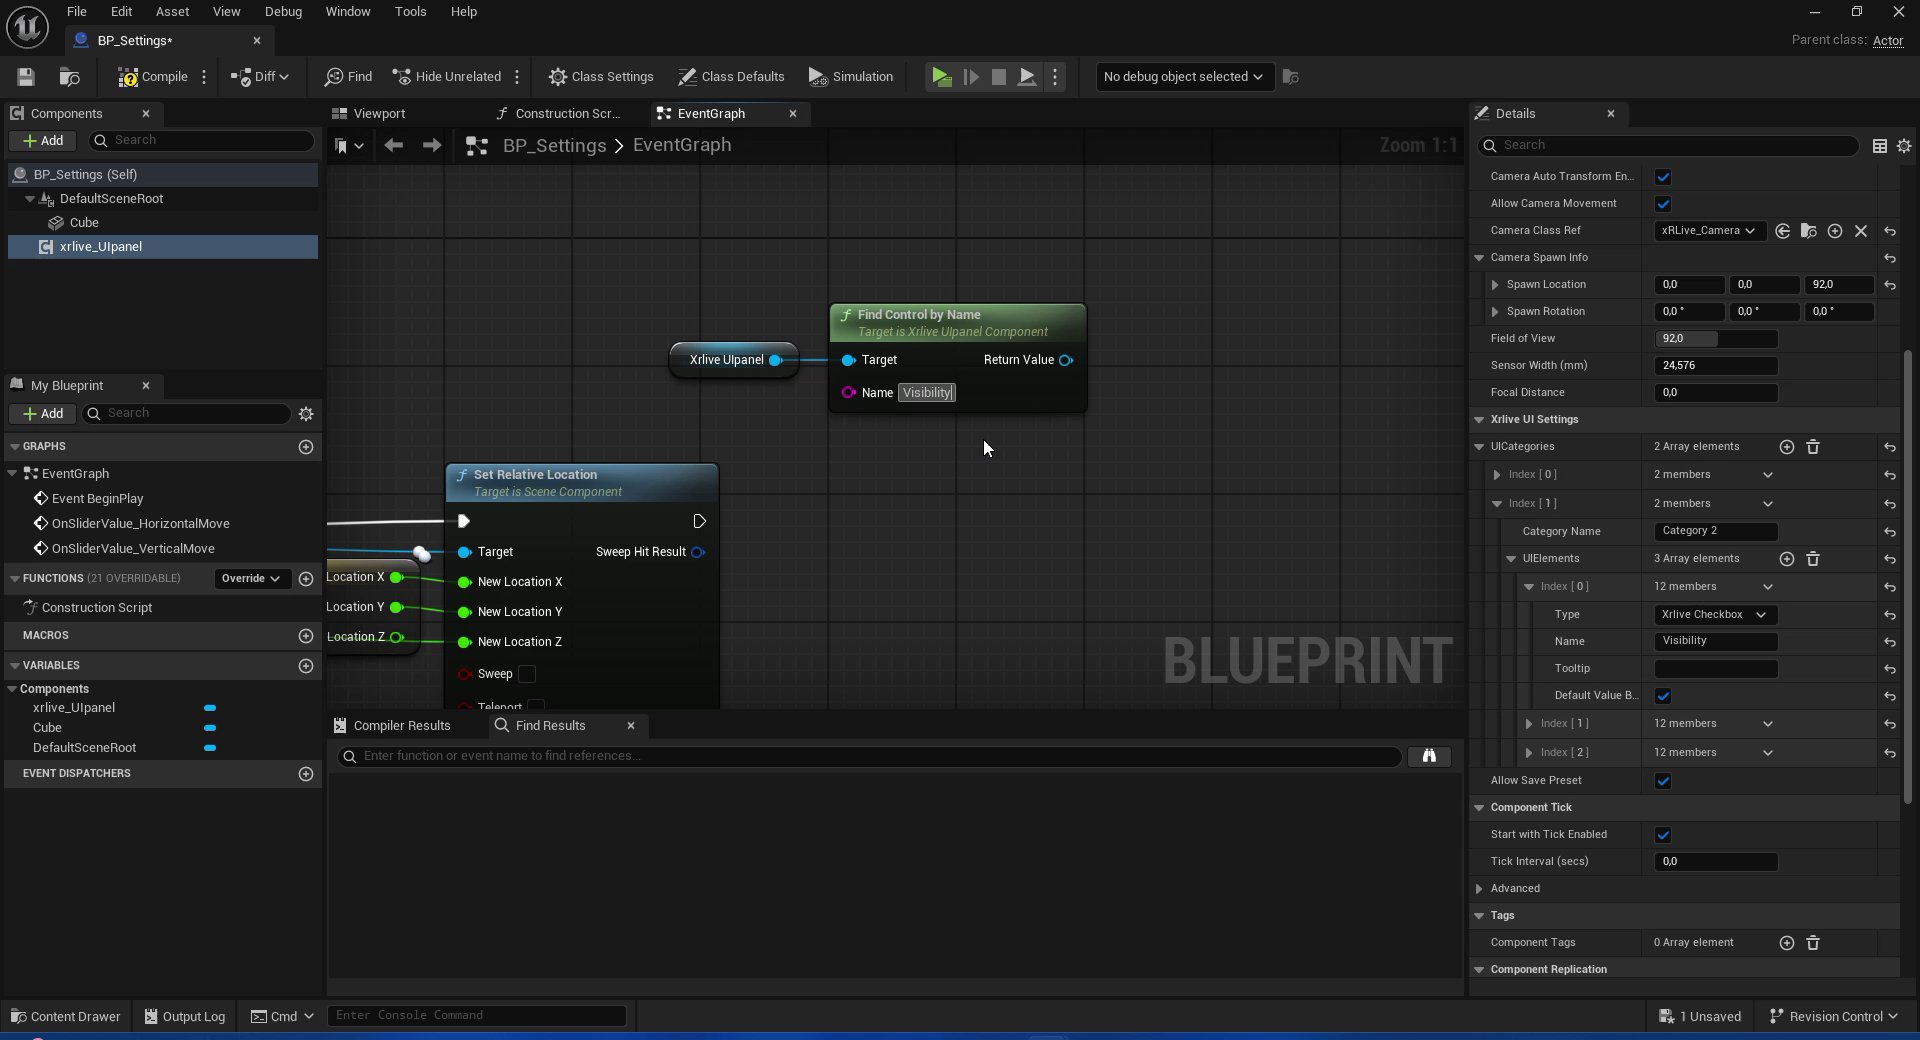
Drag `xrlive_UIpanel` into the EventGraph. Call **Find Control by Name** and set the **Name** field to `Visibility`.
***
## Step 3 — Wire the Visibility checkbox
The checkbox uses the same base pattern — `Find Control by Name` → bind node → custom event — but the assign node and output pins differ from sliders.
### 3.1 — Call Find Control by Name
Drag `xrlive_UIpanel` into the EventGraph. Call **Find Control by Name** and set the **Name** field to `Visibility`.
 ### 3.2 — Bind the checkbox event
Drag off the **Return Value** pin and search for **Bind Event to On Check Change**. Select it. A custom event node is created automatically.
Rename the custom event to `OnCheckChange_Visibility`.
### 3.2 — Bind the checkbox event
Drag off the **Return Value** pin and search for **Bind Event to On Check Change**. Select it. A custom event node is created automatically.
Rename the custom event to `OnCheckChange_Visibility`.
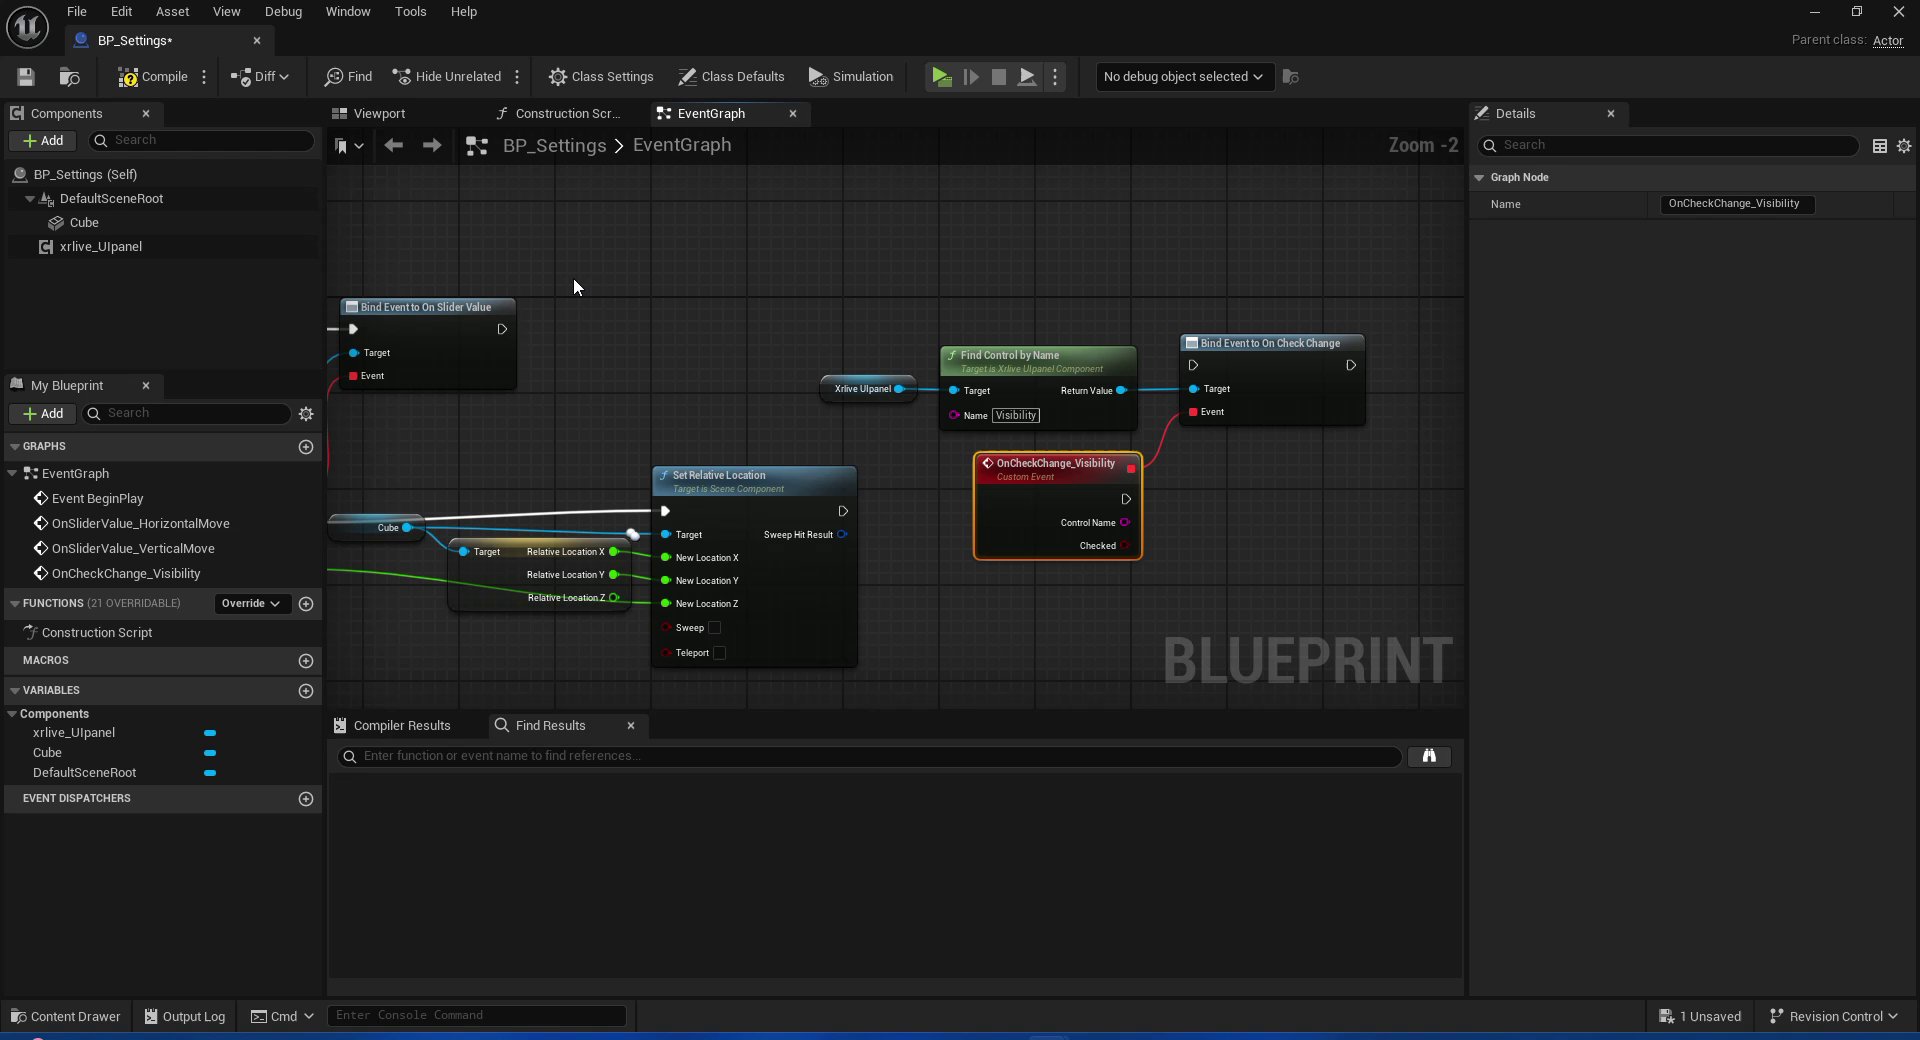 The custom event exposes two output pins:
* **Control Name** — the string identifier of the control
* **Checked** — a boolean: `true` when the checkbox is checked, `false` when unchecked
### 3.3 — Invert the value and drive Set Hidden in Game
The checkbox is labeled **Visibility** — when it is checked the Cube should be visible. However, **Set Hidden in Game** expects the inverse: `true` means hidden, `false` means shown. To reconcile these, a **NOT Boolean** node is placed between `Checked` and `New Hidden`.
Drag the **Cube** component into the EventGraph and call **Set Hidden in Game**.
Between the custom event and `Set Hidden in Game`:
1. Drag off the **Checked** pin and search for **NOT Boolean**. Select it.
2. Connect the output of **NOT** to the **New Hidden** pin of `Set Hidden in Game`.
3. Connect the **Cube** reference to the **Target** pin of `Set Hidden in Game`.
4. Connect the execution pin from the custom event to the execution pin of `Set Hidden in Game`.
The custom event exposes two output pins:
* **Control Name** — the string identifier of the control
* **Checked** — a boolean: `true` when the checkbox is checked, `false` when unchecked
### 3.3 — Invert the value and drive Set Hidden in Game
The checkbox is labeled **Visibility** — when it is checked the Cube should be visible. However, **Set Hidden in Game** expects the inverse: `true` means hidden, `false` means shown. To reconcile these, a **NOT Boolean** node is placed between `Checked` and `New Hidden`.
Drag the **Cube** component into the EventGraph and call **Set Hidden in Game**.
Between the custom event and `Set Hidden in Game`:
1. Drag off the **Checked** pin and search for **NOT Boolean**. Select it.
2. Connect the output of **NOT** to the **New Hidden** pin of `Set Hidden in Game`.
3. Connect the **Cube** reference to the **Target** pin of `Set Hidden in Game`.
4. Connect the execution pin from the custom event to the execution pin of `Set Hidden in Game`.
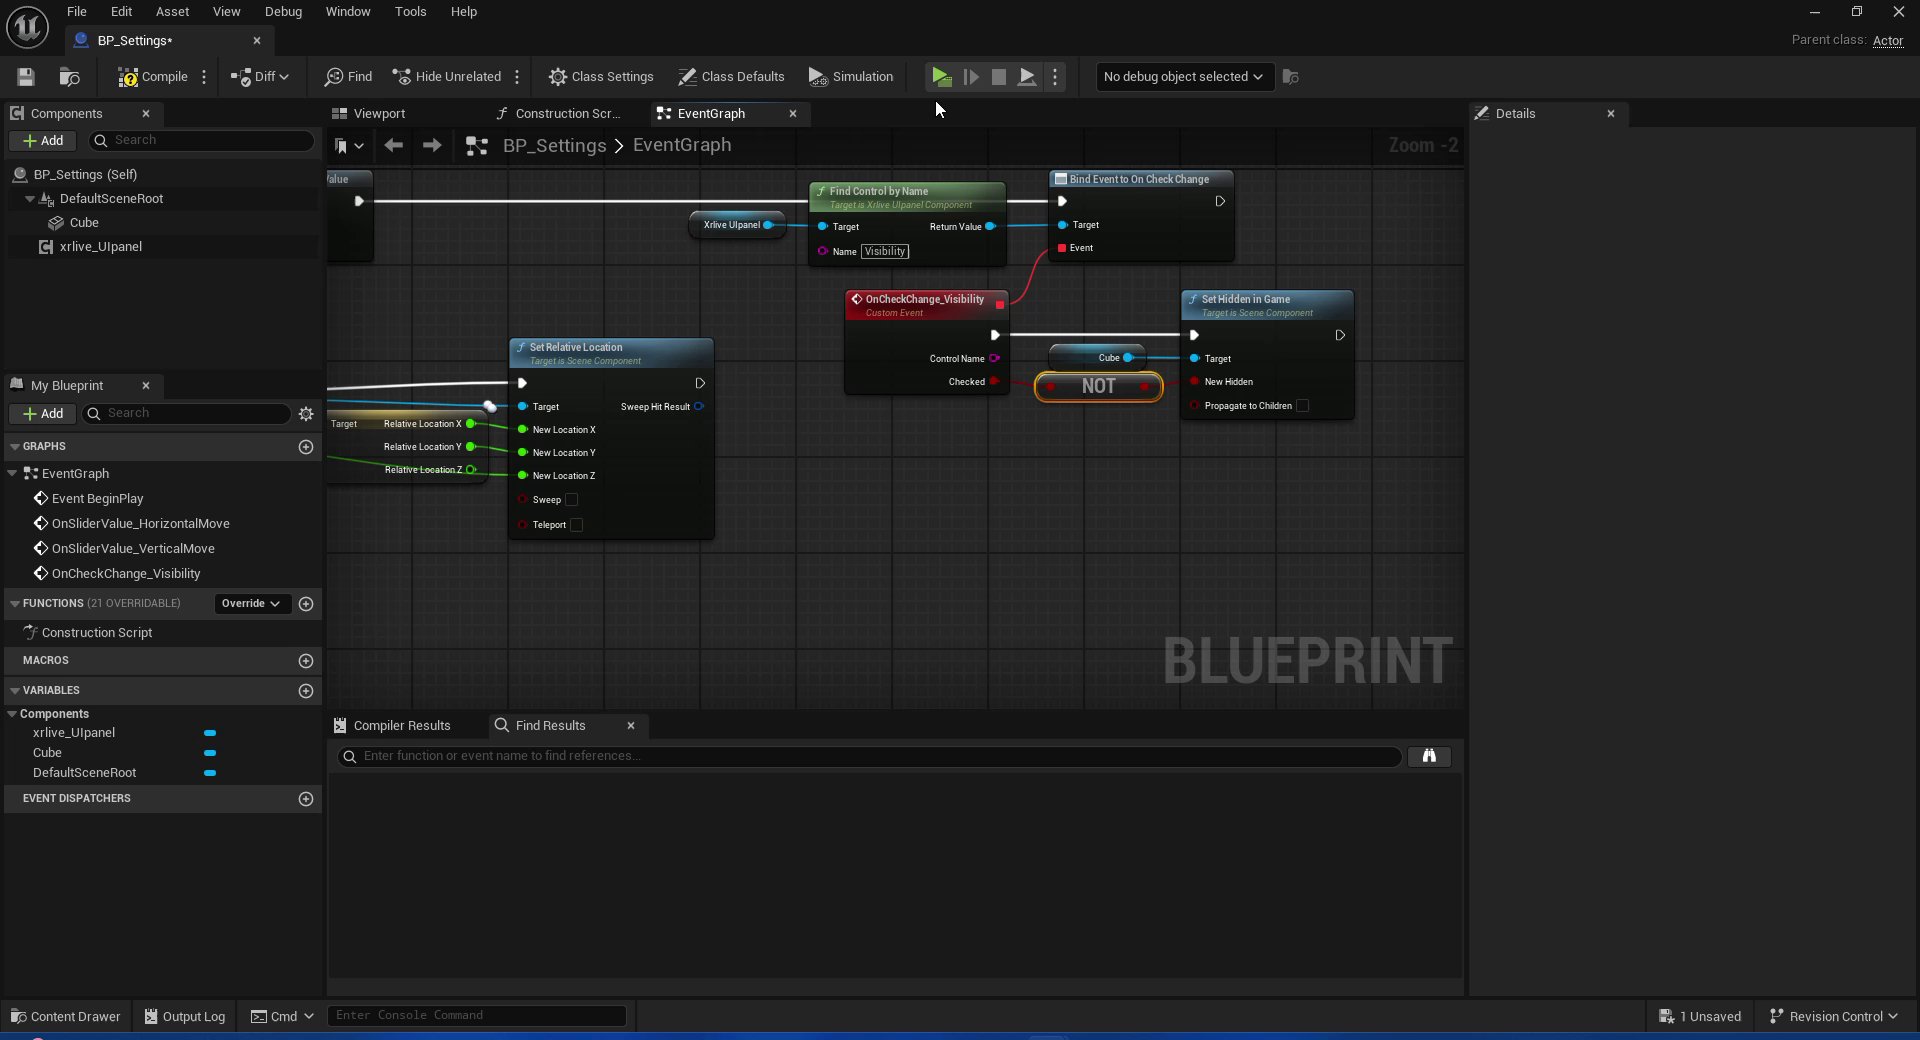 The NOT Boolean is not mandatory — it is here because the control is named Visibility, so the operator expects checked = visible. If you named your control Hidden and wanted checked to mean hidden, you would connect Checked directly to New Hidden without the NOT node.
***
## Step 4 — Wire the Color control
The color control requires an extra step before touching the EventGraph: the Cube needs a material that accepts a dynamic color at runtime. In Unreal Engine, this is done by creating a **Dynamic Material Instance** from a material that has a **Vector Parameter** exposed.
### 4.1 — Create the material
In the Content Browser, navigate to the plugin's **Materials** folder (or create one). Right-click → **Material**, name it `M_MeshMat`, and open it.
Inside the Material Graph:
1. Right-click on an empty area and search for **Vector Parameter**. Place one.
2. In the **Details** panel set **Parameter Name** to `Color`.
3. Connect the output pin of the `Color` node to the **Base Color** input of the material output node.
4. Press **Apply** and **Save**.
The NOT Boolean is not mandatory — it is here because the control is named Visibility, so the operator expects checked = visible. If you named your control Hidden and wanted checked to mean hidden, you would connect Checked directly to New Hidden without the NOT node.
***
## Step 4 — Wire the Color control
The color control requires an extra step before touching the EventGraph: the Cube needs a material that accepts a dynamic color at runtime. In Unreal Engine, this is done by creating a **Dynamic Material Instance** from a material that has a **Vector Parameter** exposed.
### 4.1 — Create the material
In the Content Browser, navigate to the plugin's **Materials** folder (or create one). Right-click → **Material**, name it `M_MeshMat`, and open it.
Inside the Material Graph:
1. Right-click on an empty area and search for **Vector Parameter**. Place one.
2. In the **Details** panel set **Parameter Name** to `Color`.
3. Connect the output pin of the `Color` node to the **Base Color** input of the material output node.
4. Press **Apply** and **Save**.
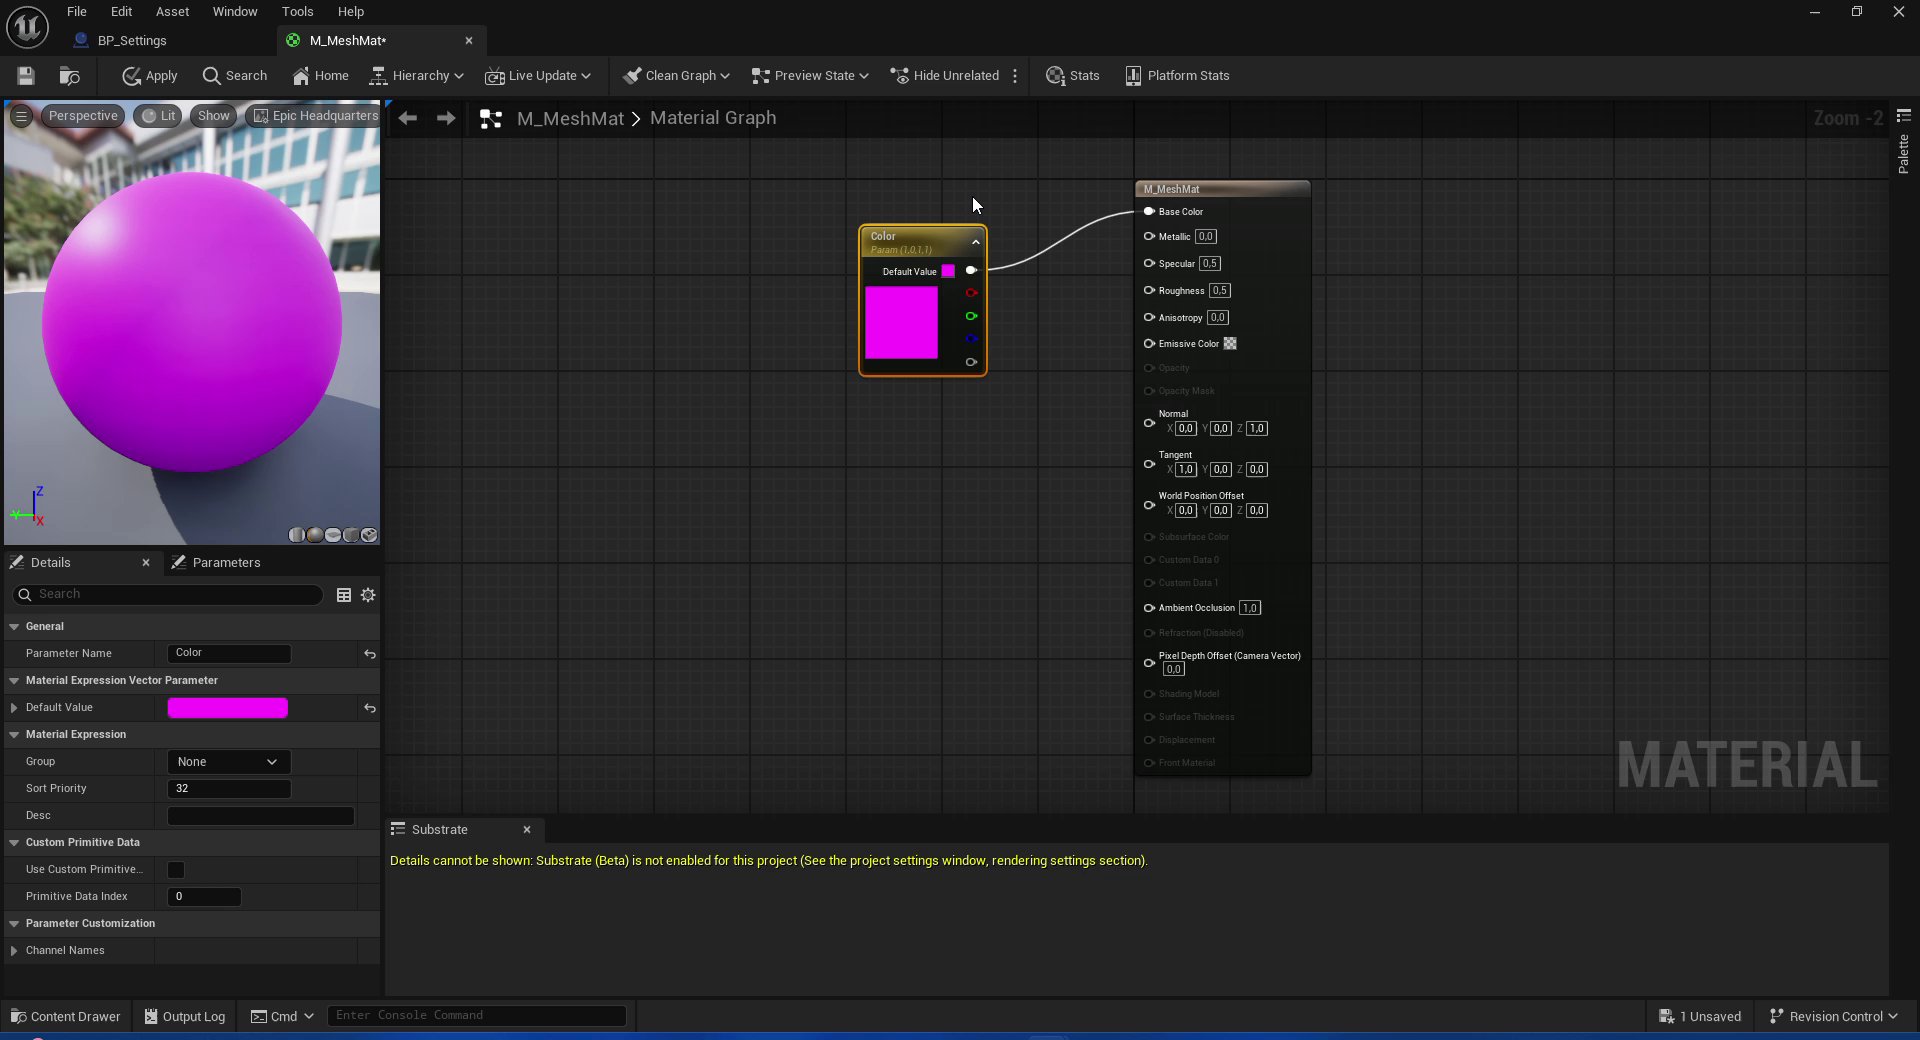 The parameter name `Color` must match exactly the string used later in the **Set Vector Parameter Value** node. Any difference in casing or spacing will cause the color change to have no effect at runtime.
### 4.2 — Set up the BeginPlay chain
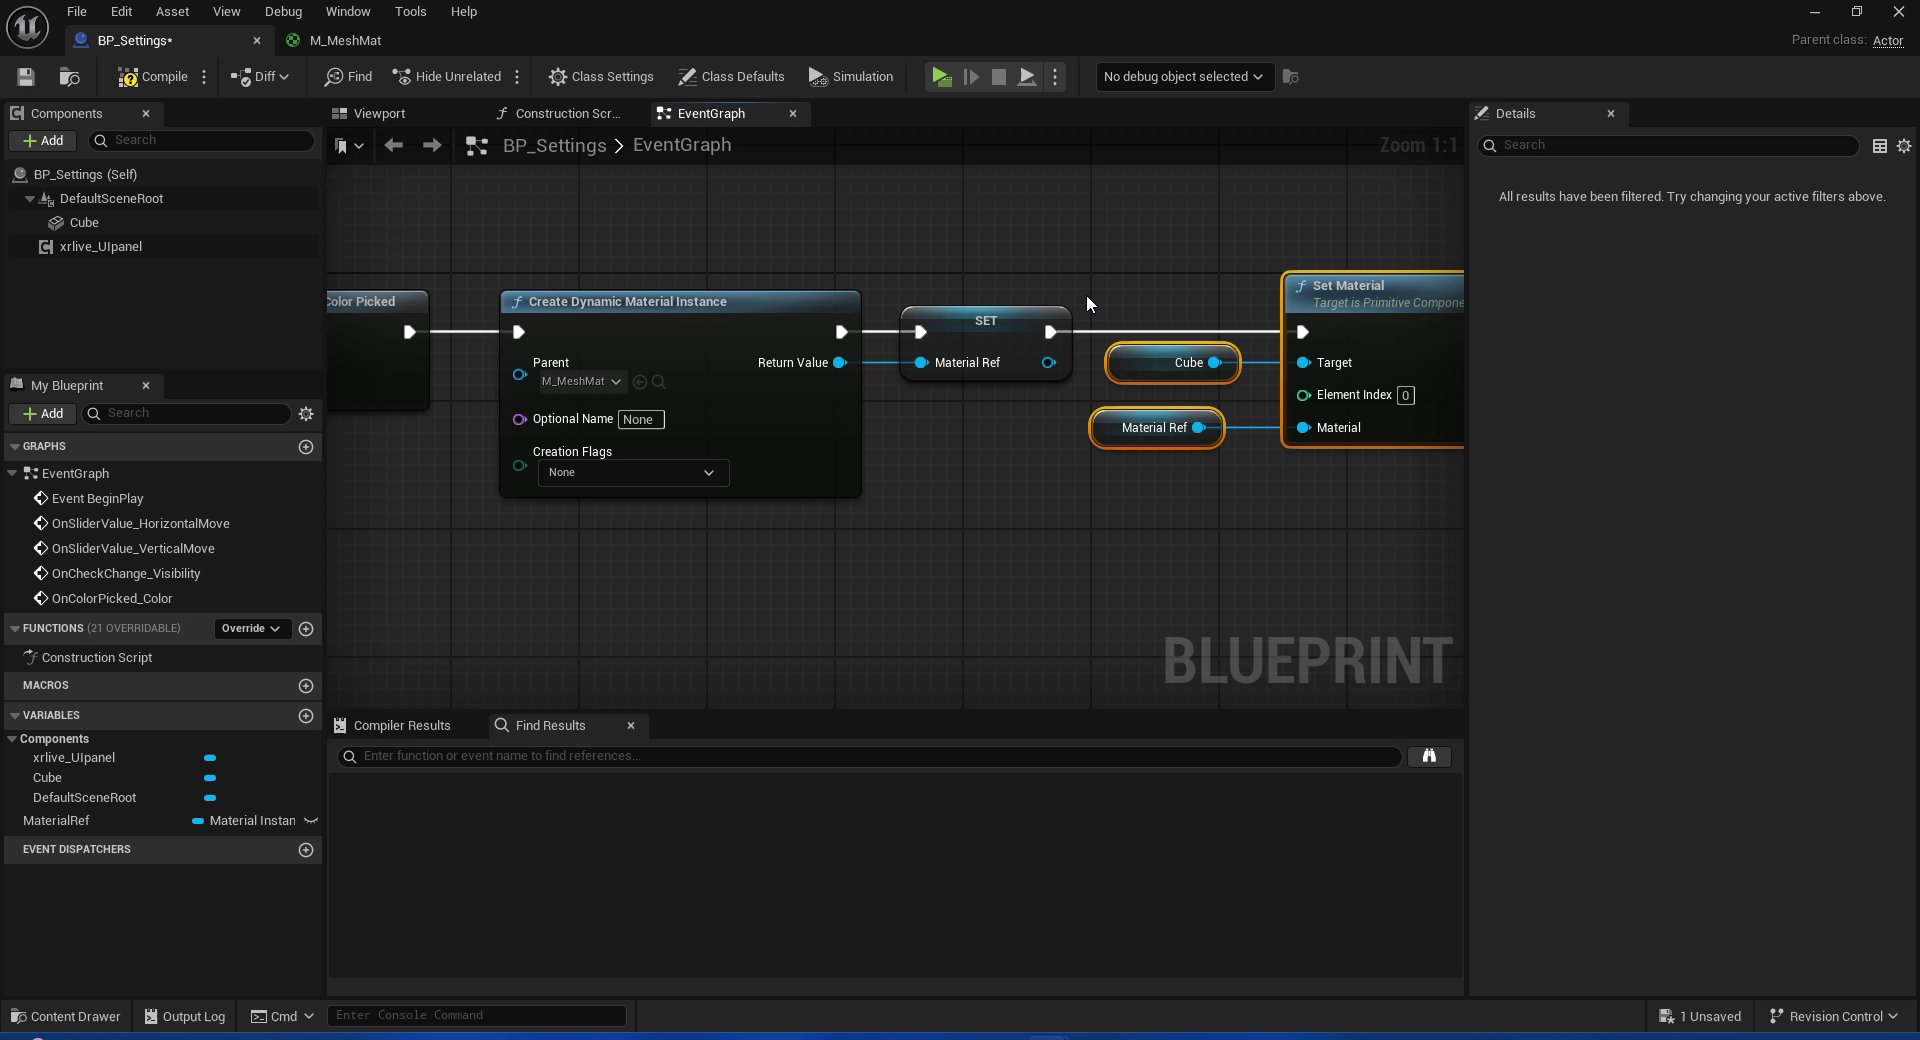
Open `BP_Settings` and go to the **EventGraph**. This chain runs once at startup to create the dynamic material instance and apply it to the Cube.
After the existing BeginPlay logic (or branching from `Event BeginPlay`):
1. Add **Create Dynamic Material Instance**. Set **Parent** to `M_MeshMat`.
2. Drag the **Return Value** pin, promote it to a variable, and name the variable `MaterialRef`. This stores the instance so it can be accessed from the color event handler.
3. Add **Set Material** targeting the **Cube** component. Connect:
* `Cube` → **Target**
* `MaterialRef` GET → **Material**
* Leave **Element Index** at `0`.
The parameter name `Color` must match exactly the string used later in the **Set Vector Parameter Value** node. Any difference in casing or spacing will cause the color change to have no effect at runtime.
### 4.2 — Set up the BeginPlay chain
Open `BP_Settings` and go to the **EventGraph**. This chain runs once at startup to create the dynamic material instance and apply it to the Cube.
After the existing BeginPlay logic (or branching from `Event BeginPlay`):
1. Add **Create Dynamic Material Instance**. Set **Parent** to `M_MeshMat`.
2. Drag the **Return Value** pin, promote it to a variable, and name the variable `MaterialRef`. This stores the instance so it can be accessed from the color event handler.
3. Add **Set Material** targeting the **Cube** component. Connect:
* `Cube` → **Target**
* `MaterialRef` GET → **Material**
* Leave **Element Index** at `0`.
 ### 4.3 — Bind the color event and wire Set Vector Parameter Value
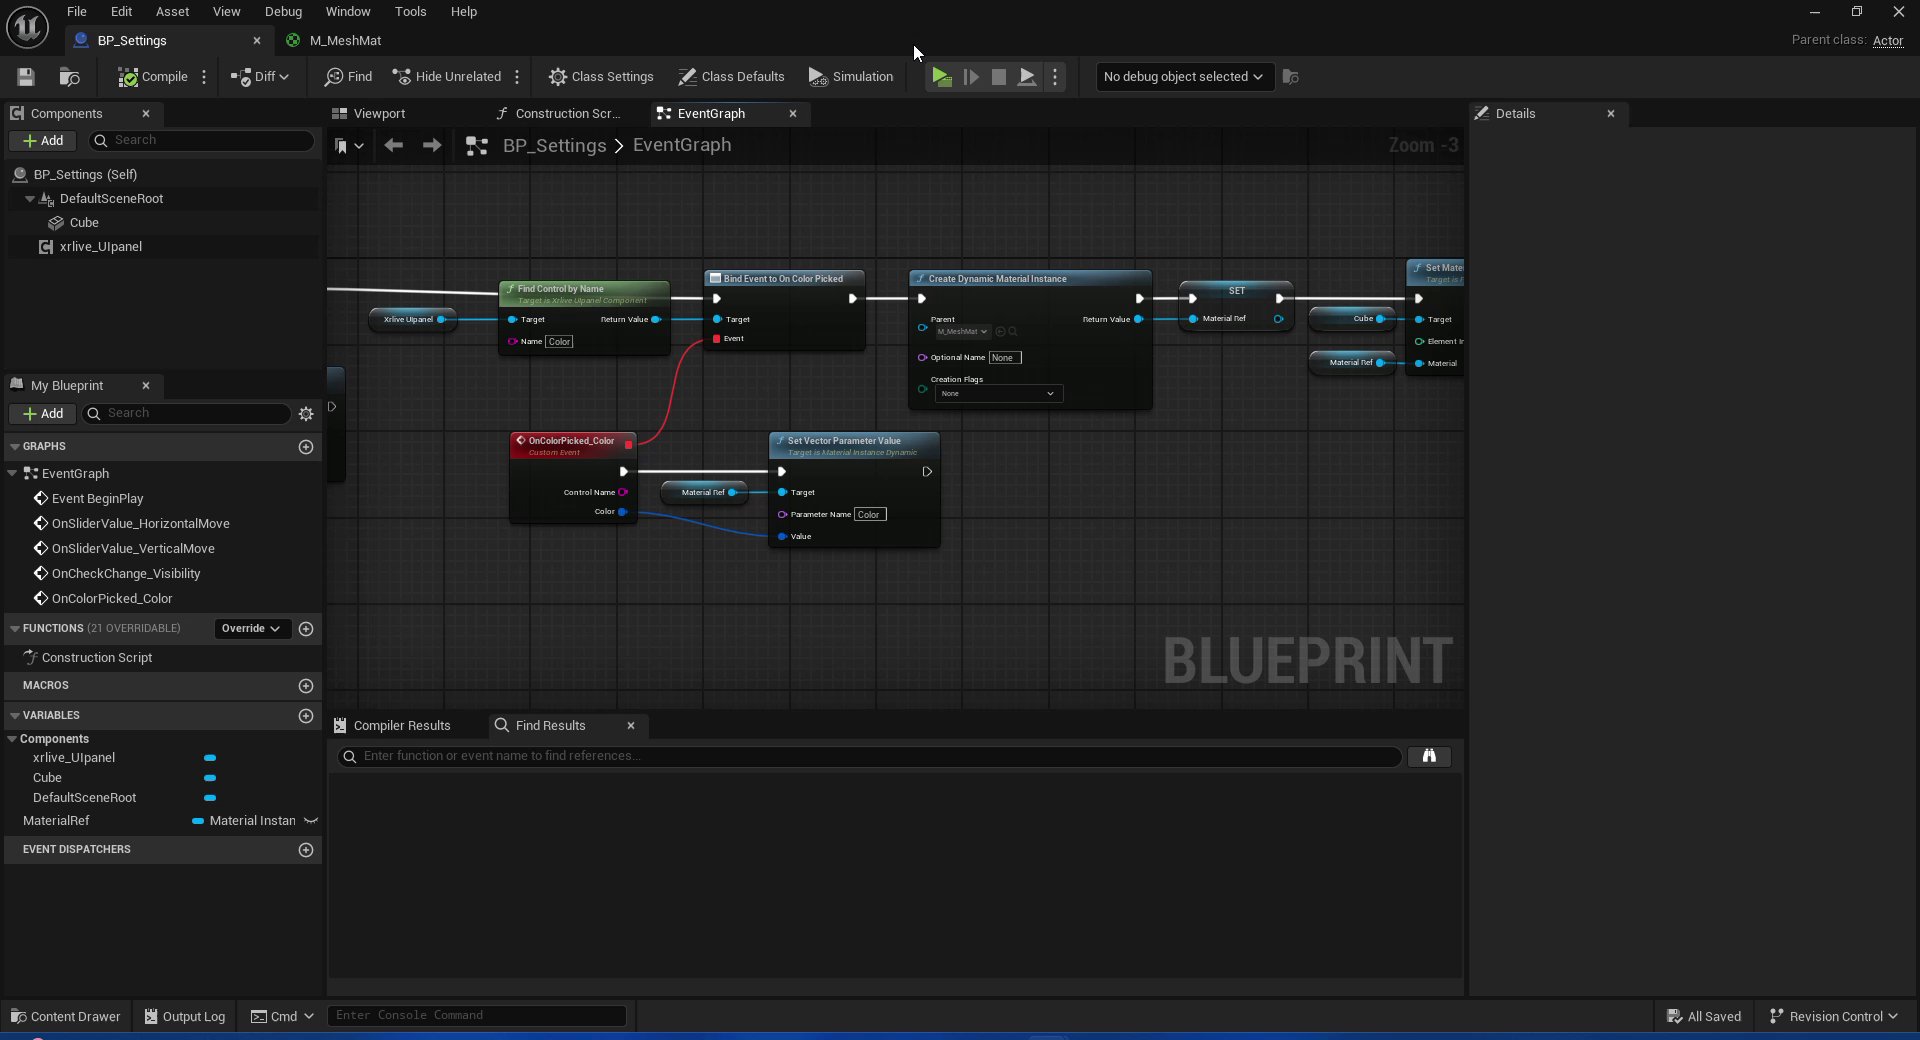
Still in the BeginPlay chain, add the binding for the color control. After the existing `Find Control by Name` / `Bind Event` calls:
1. Drag `xrlive_UIpanel` into the EventGraph. Call **Find Control by Name** and set **Name** to `Color`.
2. From **Return Value**, search for **Bind Event to On Color Picked**. Select it. A custom event `OnColorPicked_Color` is created with `Control Name` and `Color` (LinearColor) output pins.
Inside the `OnColorPicked_Color` custom event:
3. Drag the **MaterialRef** variable into the EventGraph to create a GET node.
4. From **MaterialRef**, search for **Set Vector Parameter Value**. Select it.
5. Set **Parameter Name** to `Color`.
6. Connect the **Color** output pin of the custom event to the **Value** input of `Set Vector Parameter Value`.
### 4.3 — Bind the color event and wire Set Vector Parameter Value
Still in the BeginPlay chain, add the binding for the color control. After the existing `Find Control by Name` / `Bind Event` calls:
1. Drag `xrlive_UIpanel` into the EventGraph. Call **Find Control by Name** and set **Name** to `Color`.
2. From **Return Value**, search for **Bind Event to On Color Picked**. Select it. A custom event `OnColorPicked_Color` is created with `Control Name` and `Color` (LinearColor) output pins.
Inside the `OnColorPicked_Color` custom event:
3. Drag the **MaterialRef** variable into the EventGraph to create a GET node.
4. From **MaterialRef**, search for **Set Vector Parameter Value**. Select it.
5. Set **Parameter Name** to `Color`.
6. Connect the **Color** output pin of the custom event to the **Value** input of `Set Vector Parameter Value`.
 ***
## Step 5 — Wire the Shape dropdown
The dropdown differs from the other controls in how the event value is handled: instead of driving a single property, the `Selected Item` string is used to branch execution with a **Switch on String** node, and each branch applies a different Static Mesh to the Cube.
### 5.1 — Bind the dropdown event
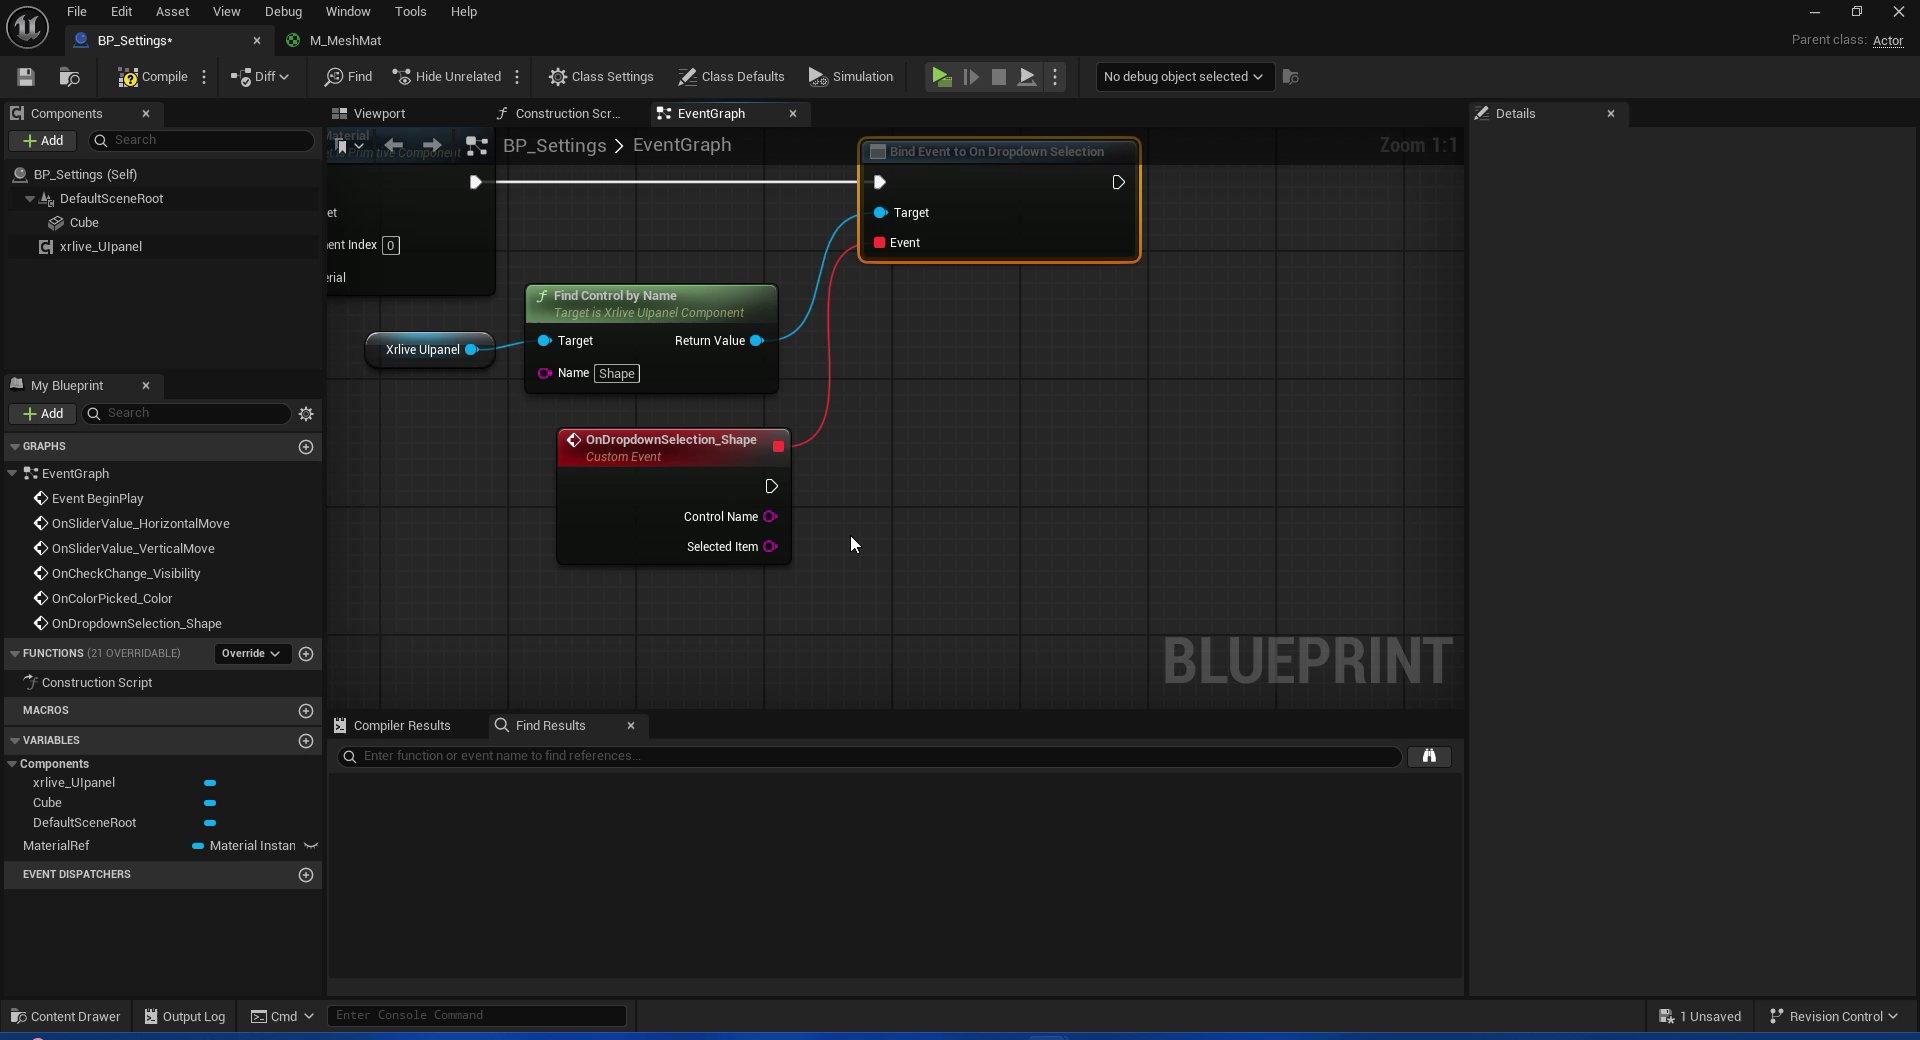
From `xrlive_UIpanel`, call **Find Control by Name** and set **Name** to `Shape`. Drag off **Return Value** and search for **Bind Event to On Dropdown Selection**. The custom event `OnDropdownSelection_Shape` is created with `Control Name` and `Selected Item` (String) output pins.
***
## Step 5 — Wire the Shape dropdown
The dropdown differs from the other controls in how the event value is handled: instead of driving a single property, the `Selected Item` string is used to branch execution with a **Switch on String** node, and each branch applies a different Static Mesh to the Cube.
### 5.1 — Bind the dropdown event
From `xrlive_UIpanel`, call **Find Control by Name** and set **Name** to `Shape`. Drag off **Return Value** and search for **Bind Event to On Dropdown Selection**. The custom event `OnDropdownSelection_Shape` is created with `Control Name` and `Selected Item` (String) output pins.
 ### 5.2 — Create a NewMesh variable
In the **My Blueprint** panel, create a new variable named `NewMesh` of type **Static Mesh**. This variable will temporarily hold the mesh chosen in each switch branch before it is applied to the Cube.
### 5.3 — Route selection with Switch on String
Drag off the **Selected Item** pin and search for **Switch on String**. This node creates a separate execution output for each string value you define. Click **Add pin** three times and name the cases exactly as declared in `UICategories`: `Cube`, `Sphere`, `Cylinder`.
### 5.2 — Create a NewMesh variable
In the **My Blueprint** panel, create a new variable named `NewMesh` of type **Static Mesh**. This variable will temporarily hold the mesh chosen in each switch branch before it is applied to the Cube.
### 5.3 — Route selection with Switch on String
Drag off the **Selected Item** pin and search for **Switch on String**. This node creates a separate execution output for each string value you define. Click **Add pin** three times and name the cases exactly as declared in `UICategories`: `Cube`, `Sphere`, `Cylinder`.
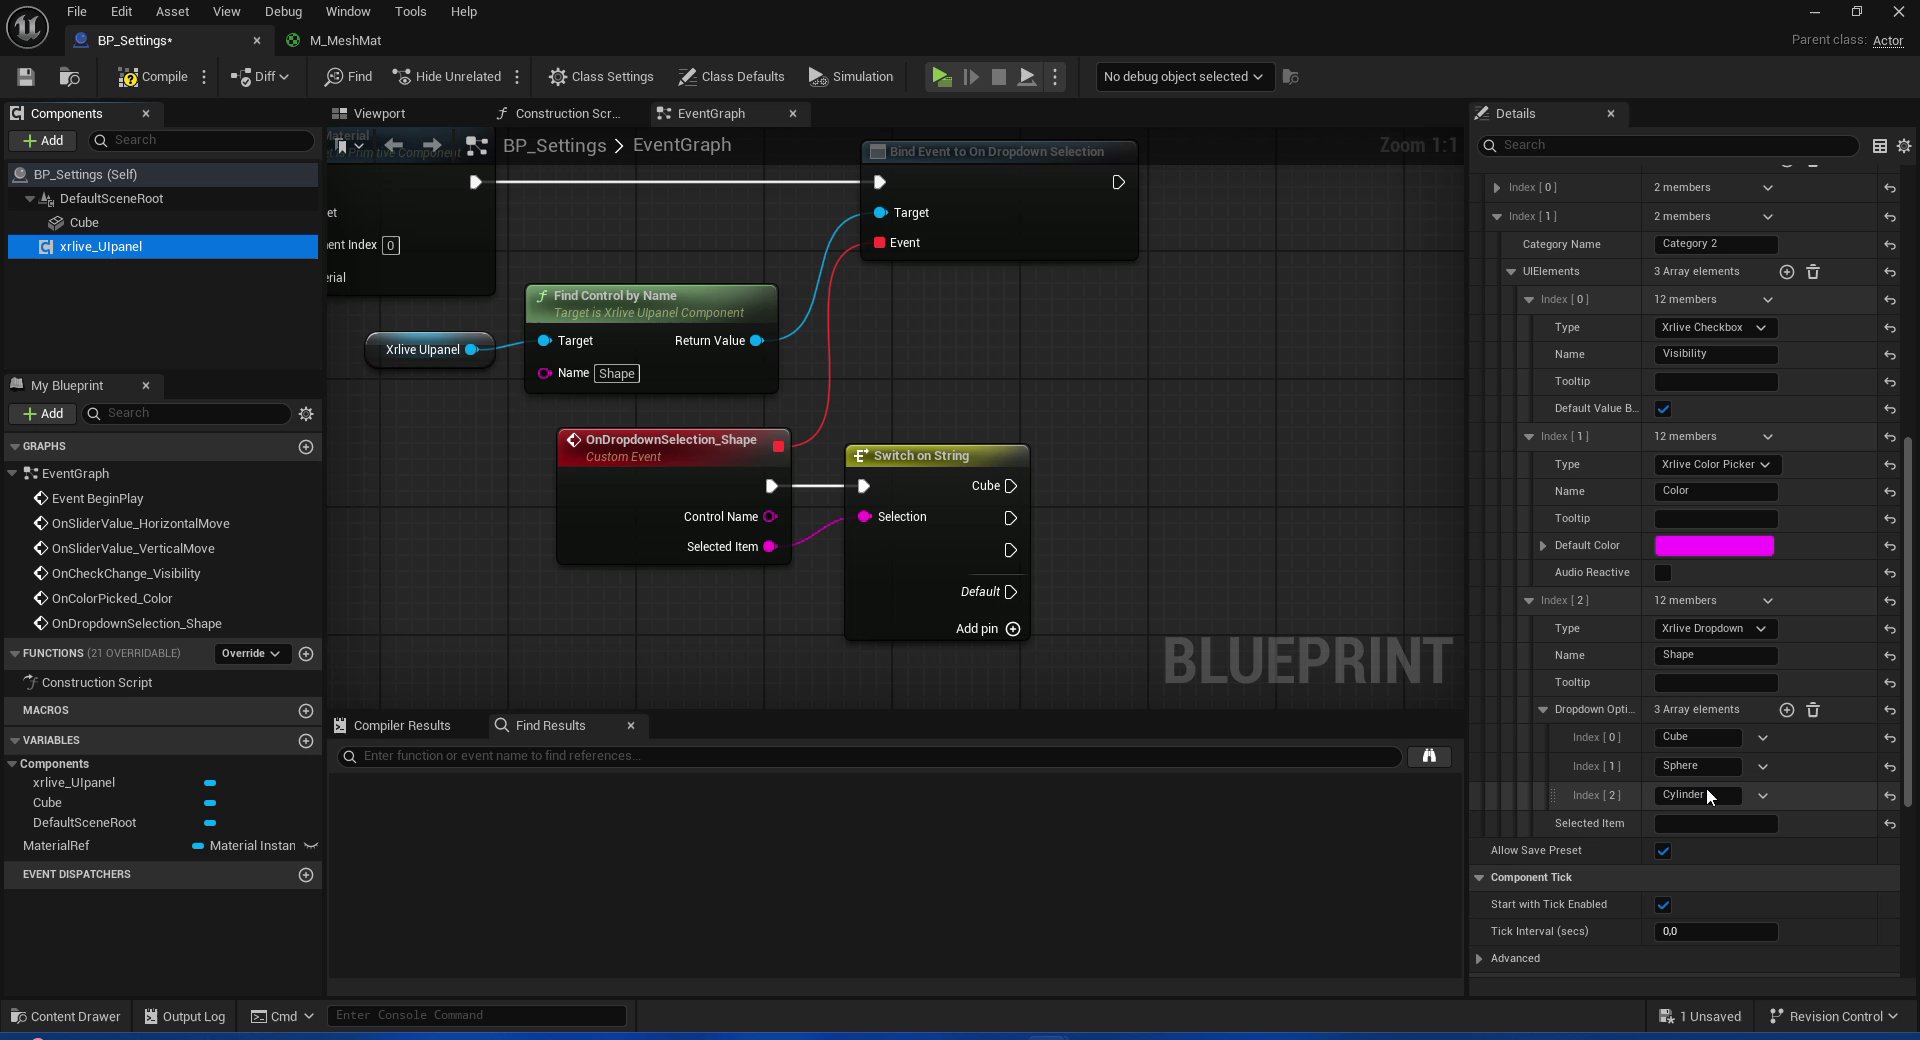 The case strings in Switch on String must match the dropdown option strings exactly — same casing and spacing as declared in `UICategories`. A mismatch will cause that branch to never fire and the `Default` pin to trigger instead.
### 5.4 — Assign the mesh for each case
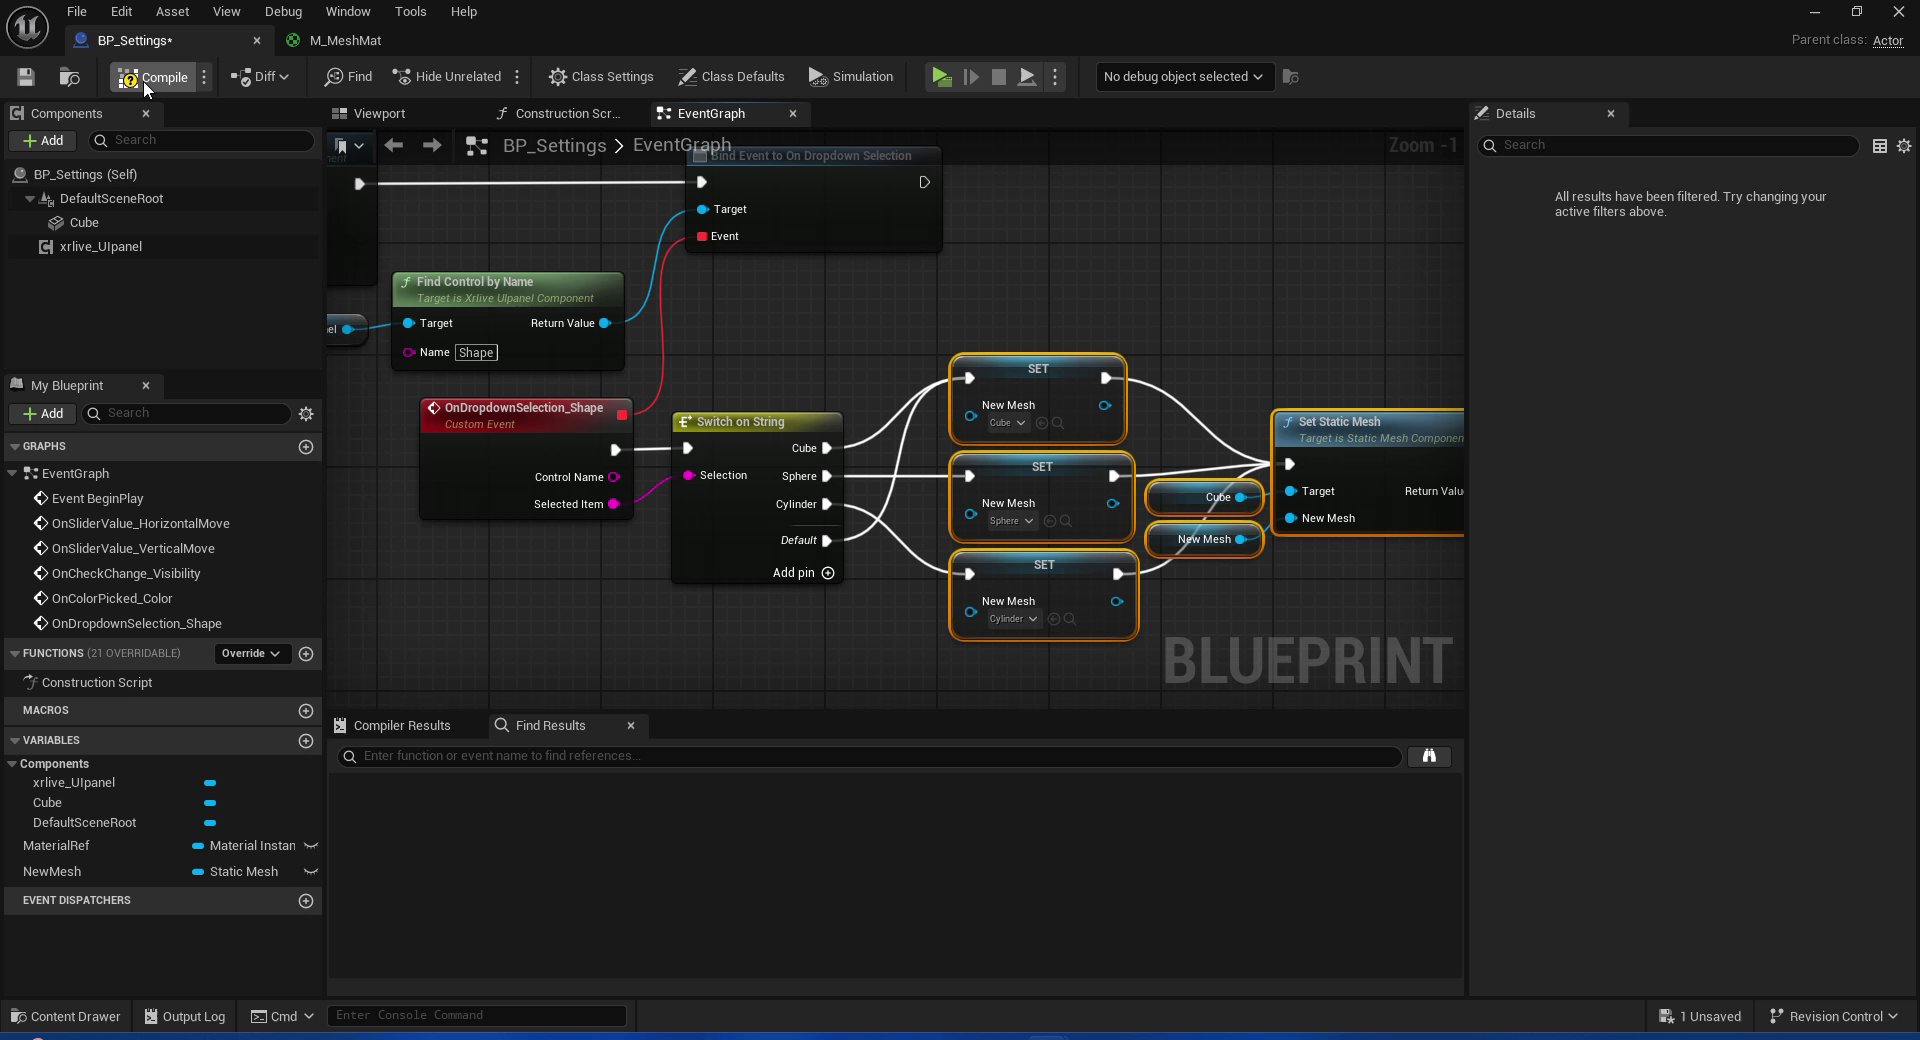
For each case pin, drag the **NewMesh** variable as a SET node and assign the corresponding Static Mesh asset from `Engine/BasicShapes`:
* `Cube` pin → **SET NewMesh** = `Engine/BasicShapes/Cube`
* `Sphere` pin → **SET NewMesh** = `Engine/BasicShapes/Sphere`
* `Cylinder` pin → **SET NewMesh** = `Engine/BasicShapes/Cylinder`
The Engine's BasicShapes are not visible in the Content Browser by default. Click the **Settings** button in the Content Browser toolbar and enable **Show Engine Content** to make them available.
### 5.5 — Apply the mesh with Set Static Mesh
Connect the execution output of all three SET nodes to a single **Set Static Mesh** node targeting the **Cube** component. Add a **NewMesh** GET node and connect it to the **New Mesh** input of `Set Static Mesh`.
The case strings in Switch on String must match the dropdown option strings exactly — same casing and spacing as declared in `UICategories`. A mismatch will cause that branch to never fire and the `Default` pin to trigger instead.
### 5.4 — Assign the mesh for each case
For each case pin, drag the **NewMesh** variable as a SET node and assign the corresponding Static Mesh asset from `Engine/BasicShapes`:
* `Cube` pin → **SET NewMesh** = `Engine/BasicShapes/Cube`
* `Sphere` pin → **SET NewMesh** = `Engine/BasicShapes/Sphere`
* `Cylinder` pin → **SET NewMesh** = `Engine/BasicShapes/Cylinder`
The Engine's BasicShapes are not visible in the Content Browser by default. Click the **Settings** button in the Content Browser toolbar and enable **Show Engine Content** to make them available.
### 5.5 — Apply the mesh with Set Static Mesh
Connect the execution output of all three SET nodes to a single **Set Static Mesh** node targeting the **Cube** component. Add a **NewMesh** GET node and connect it to the **New Mesh** input of `Set Static Mesh`.
 ***
## What you have now
All five controls from Category 2 are fully wired:
* **Horizontal move** → `Set Relative Location`, X axis
* **Vertical move** → `Set Relative Location`, Y axis
* **Visibility** → `Set Hidden in Game` on the Cube (inverted through NOT Boolean)
* **Color** → `Set Vector Parameter Value` on a Dynamic Material Instance applied to the Cube
* **Shape** → `Set Static Mesh` on the Cube, switching between Cube / Sphere / Cylinder from Engine BasicShapes
To learn more about how each control type works in depth, see the UI Components reference:
[Slider](/sdk/ui-components/slider) · [Checkbox](/sdk/ui-components/checkbox) · [Color Picker](/sdk/ui-components/color-picker) · [Dropdown](/sdk/ui-components/dropdown)
***
## What you have now
All five controls from Category 2 are fully wired:
* **Horizontal move** → `Set Relative Location`, X axis
* **Vertical move** → `Set Relative Location`, Y axis
* **Visibility** → `Set Hidden in Game` on the Cube (inverted through NOT Boolean)
* **Color** → `Set Vector Parameter Value` on a Dynamic Material Instance applied to the Cube
* **Shape** → `Set Static Mesh` on the Cube, switching between Cube / Sphere / Cylinder from Engine BasicShapes
To learn more about how each control type works in depth, see the UI Components reference:
[Slider](/sdk/ui-components/slider) · [Checkbox](/sdk/ui-components/checkbox) · [Color Picker](/sdk/ui-components/color-picker) · [Dropdown](/sdk/ui-components/dropdown)