> ## Documentation Index
> Fetch the complete documentation index at: https://xrlive.mintlify.site/llms.txt
> Use this file to discover all available pages before exploring further.
# Plugin & Scene Setup
> Create BP_Settings, add the Cube mesh, and configure the xrlive_UIpanel component
With the project, plugin, and map in place, this module walks through creating the core actor that drives your visual — `BP_Settings` — adding the shape mesh to it, and fully configuring the `xrlive_UIpanel` component that connects your visual to the xRLive operator system.
## 1. Create BP\_Settings
In the Content Browser, navigate to your plugin's `Blueprints` folder (`Plugins > MyFirstVisual Content > Blueprints`). Right-click in the empty area and choose **Blueprint Class**.
In the **Pick Parent Class** dialog, click **All Classes** at the bottom and search for `XRLiveActor`. Select it and click **Select**.
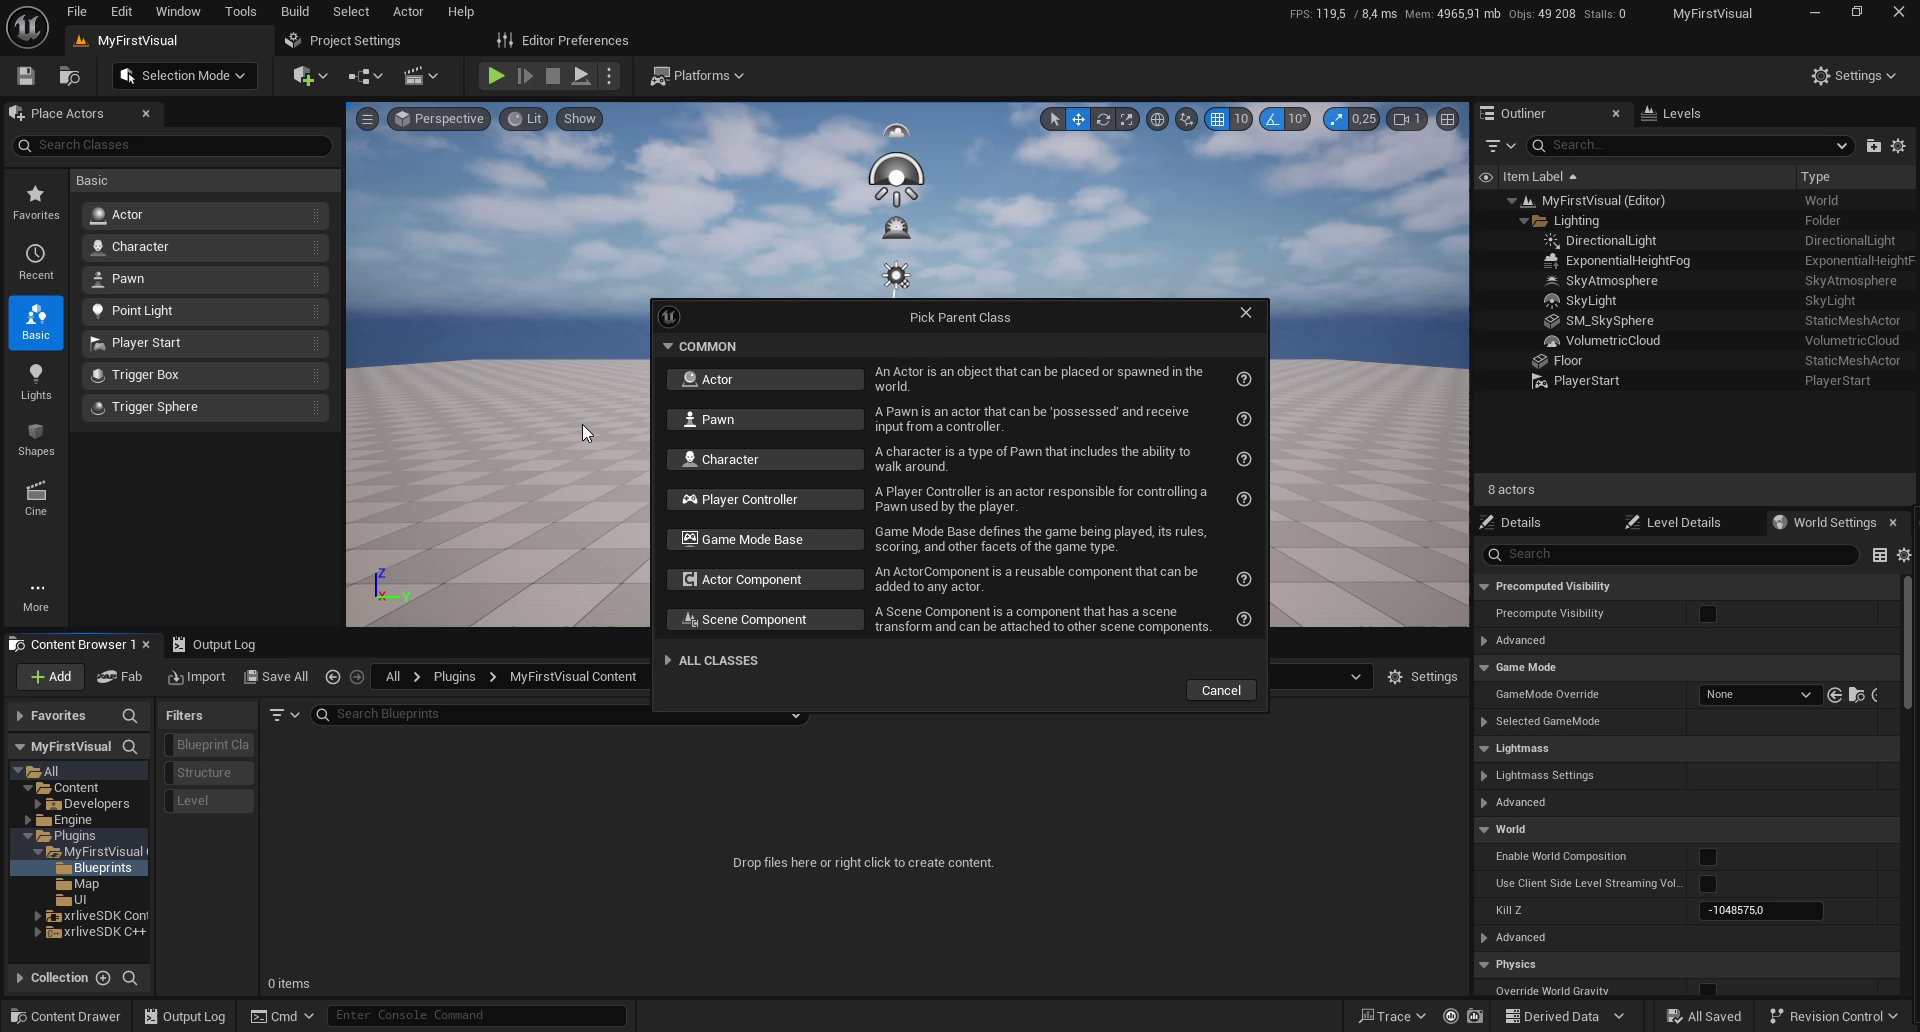 Name the new Blueprint `BP_Settings`. This is the actor that will hold all xRLive SDK components and drive the entire visual.
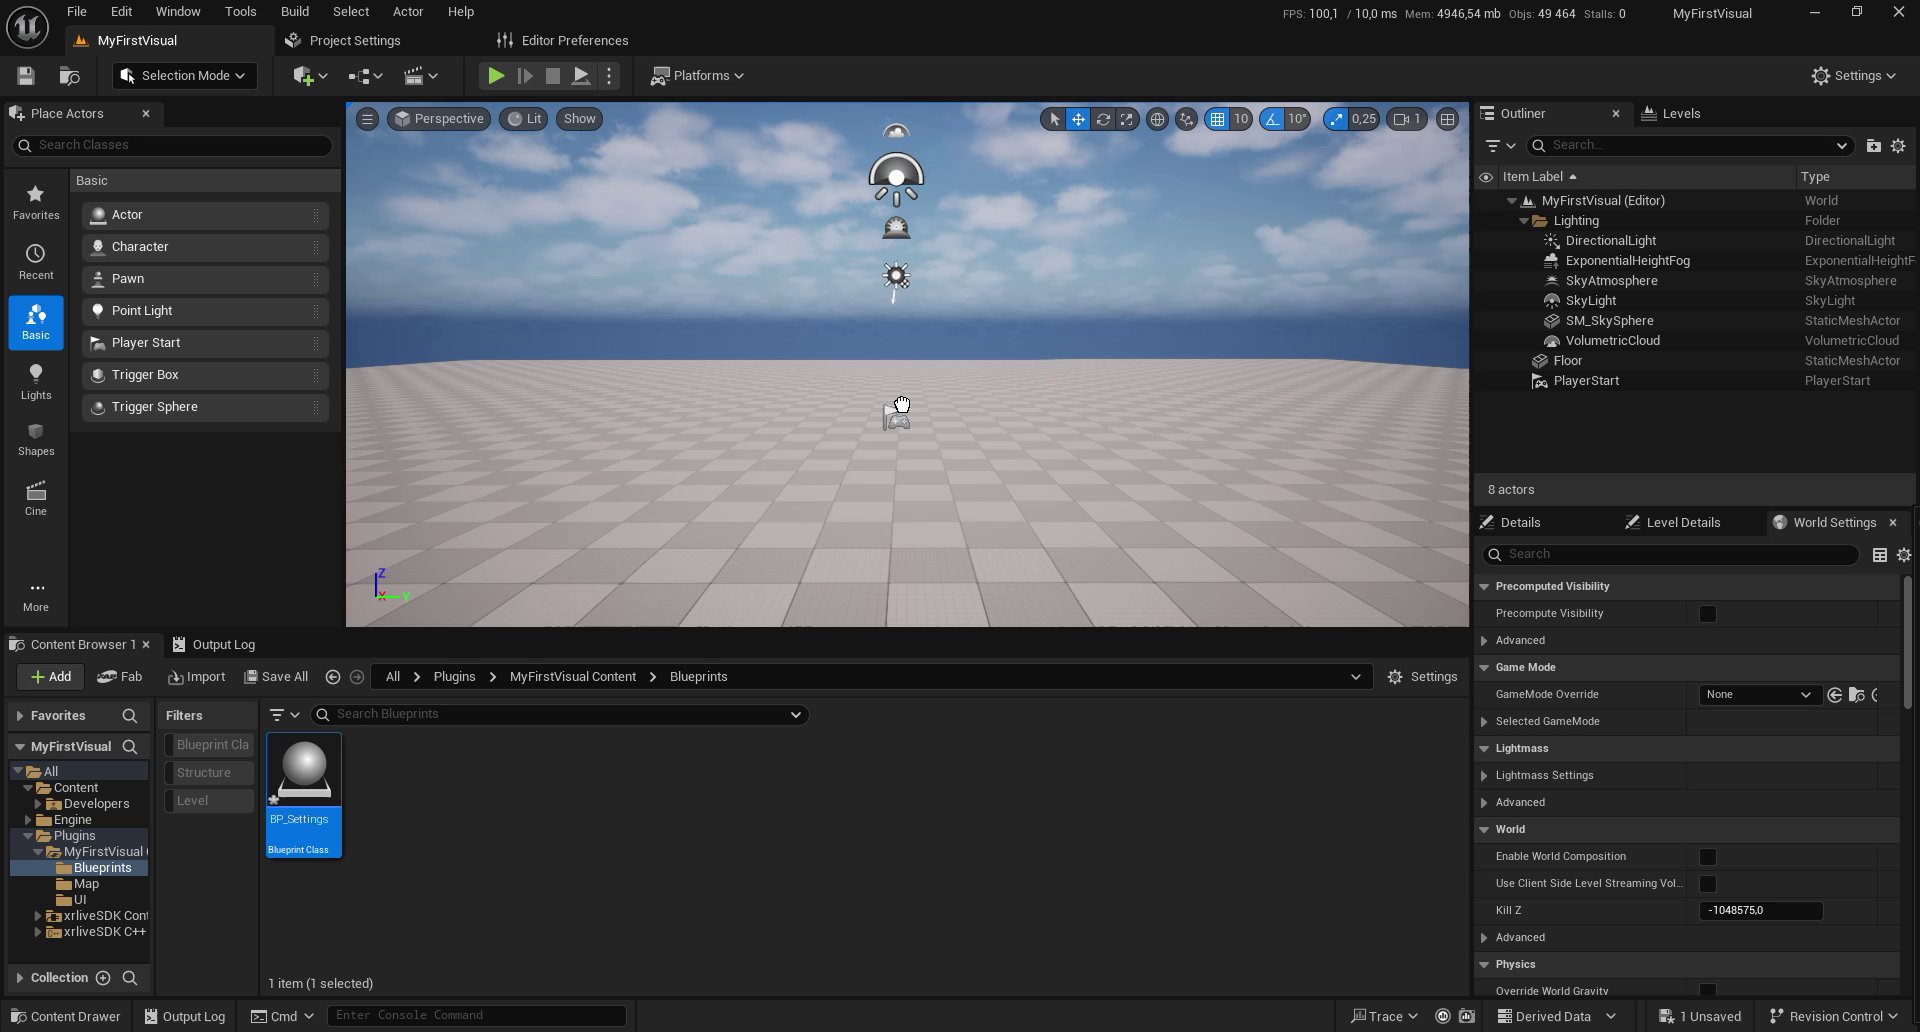 Drag `BP_Settings` from the Content Browser into the level viewport to place it in the scene.
## 2. Add the Cube component
For this tutorial we use a **Cube Static Mesh**, but the shape component can be replaced by any Unreal Engine asset type — including but not limited to custom Static Meshes, Skeletal Meshes, Instanced Static Meshes, Niagara Particle Systems, lights, audio components, and more. The xRLive operator control system works the same regardless of what is in the scene.
Double-click `BP_Settings` to open the Blueprint editor. In the **Components** panel on the left, click **+ Add** and choose **Cube** (or **Static Mesh** if you prefer to assign the mesh manually).
Drag `BP_Settings` from the Content Browser into the level viewport to place it in the scene.
## 2. Add the Cube component
For this tutorial we use a **Cube Static Mesh**, but the shape component can be replaced by any Unreal Engine asset type — including but not limited to custom Static Meshes, Skeletal Meshes, Instanced Static Meshes, Niagara Particle Systems, lights, audio components, and more. The xRLive operator control system works the same regardless of what is in the scene.
Double-click `BP_Settings` to open the Blueprint editor. In the **Components** panel on the left, click **+ Add** and choose **Cube** (or **Static Mesh** if you prefer to assign the mesh manually).
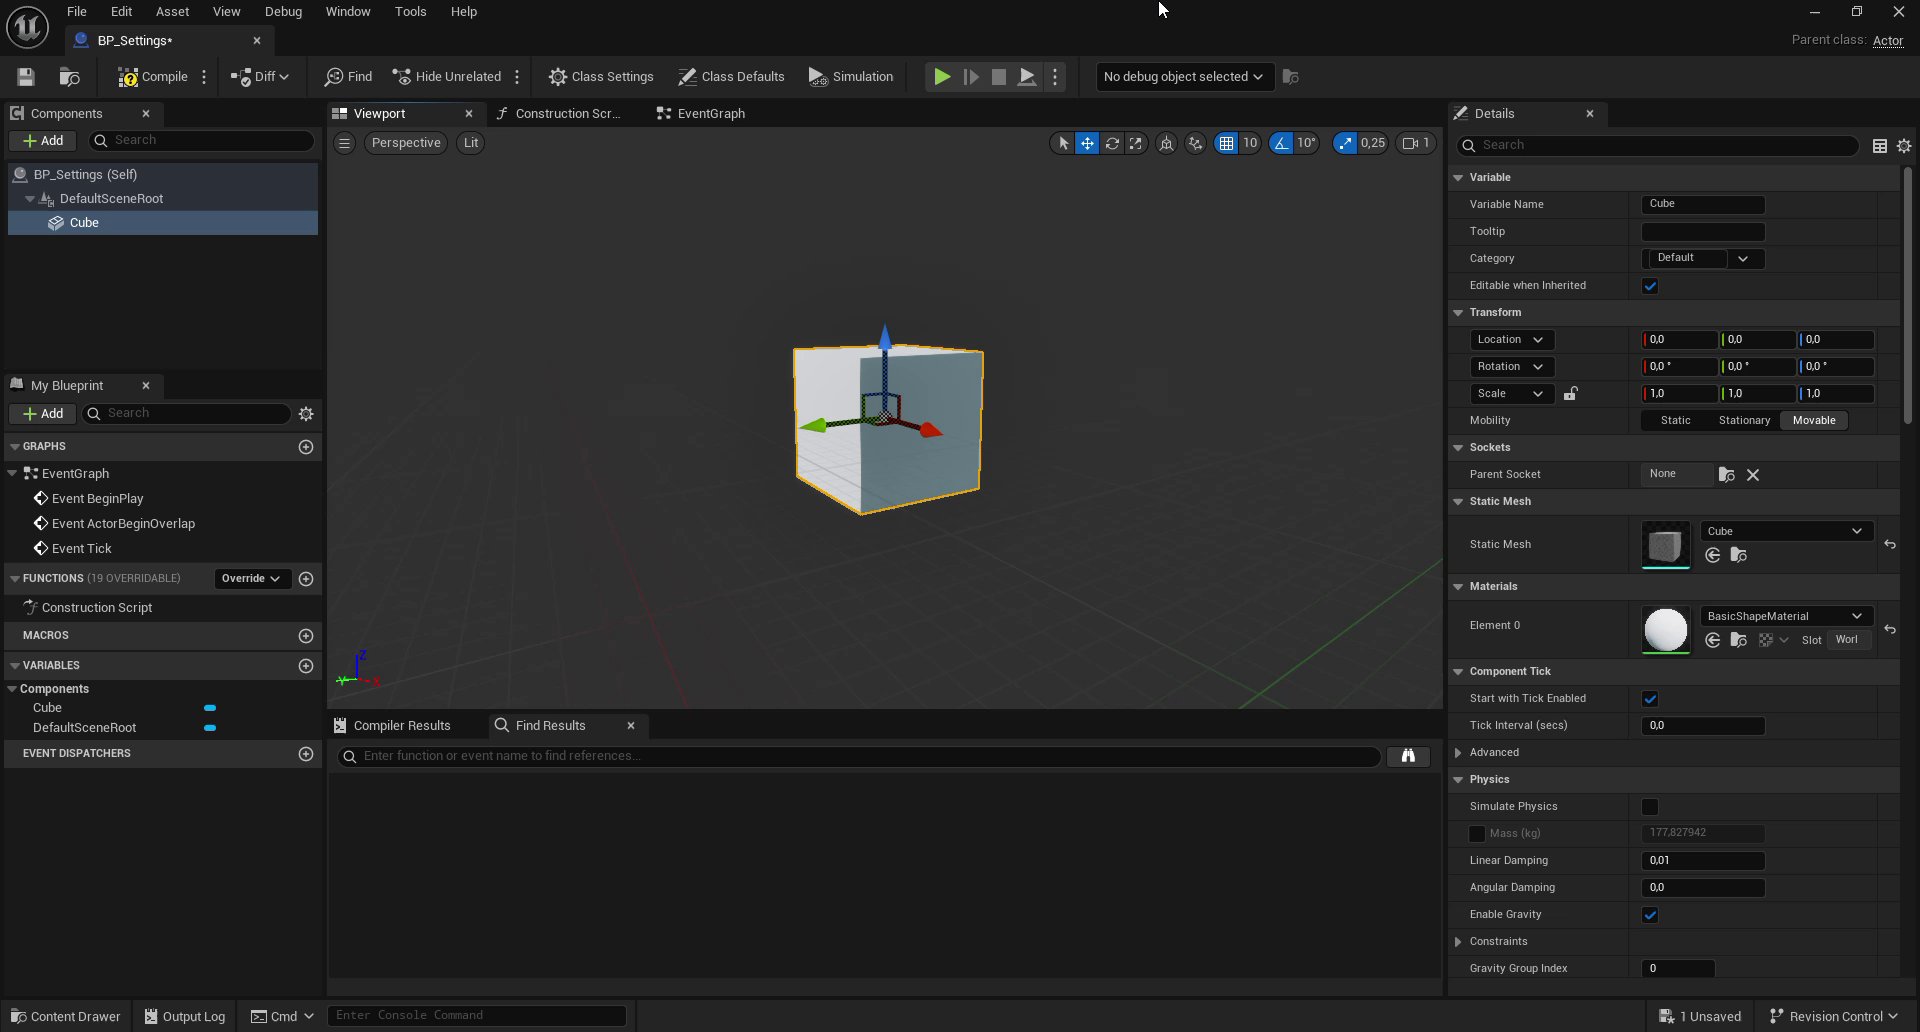 The Cube is the shape the operator will control. Its transform, color, and visibility will all be driven by operator controls in later modules.
## 3. Add the xrlive\_UIpanel component
Still in the **Components** panel, click **+ Add** again and search for `xrlive_UIpanel`. Select it to add it to the actor.
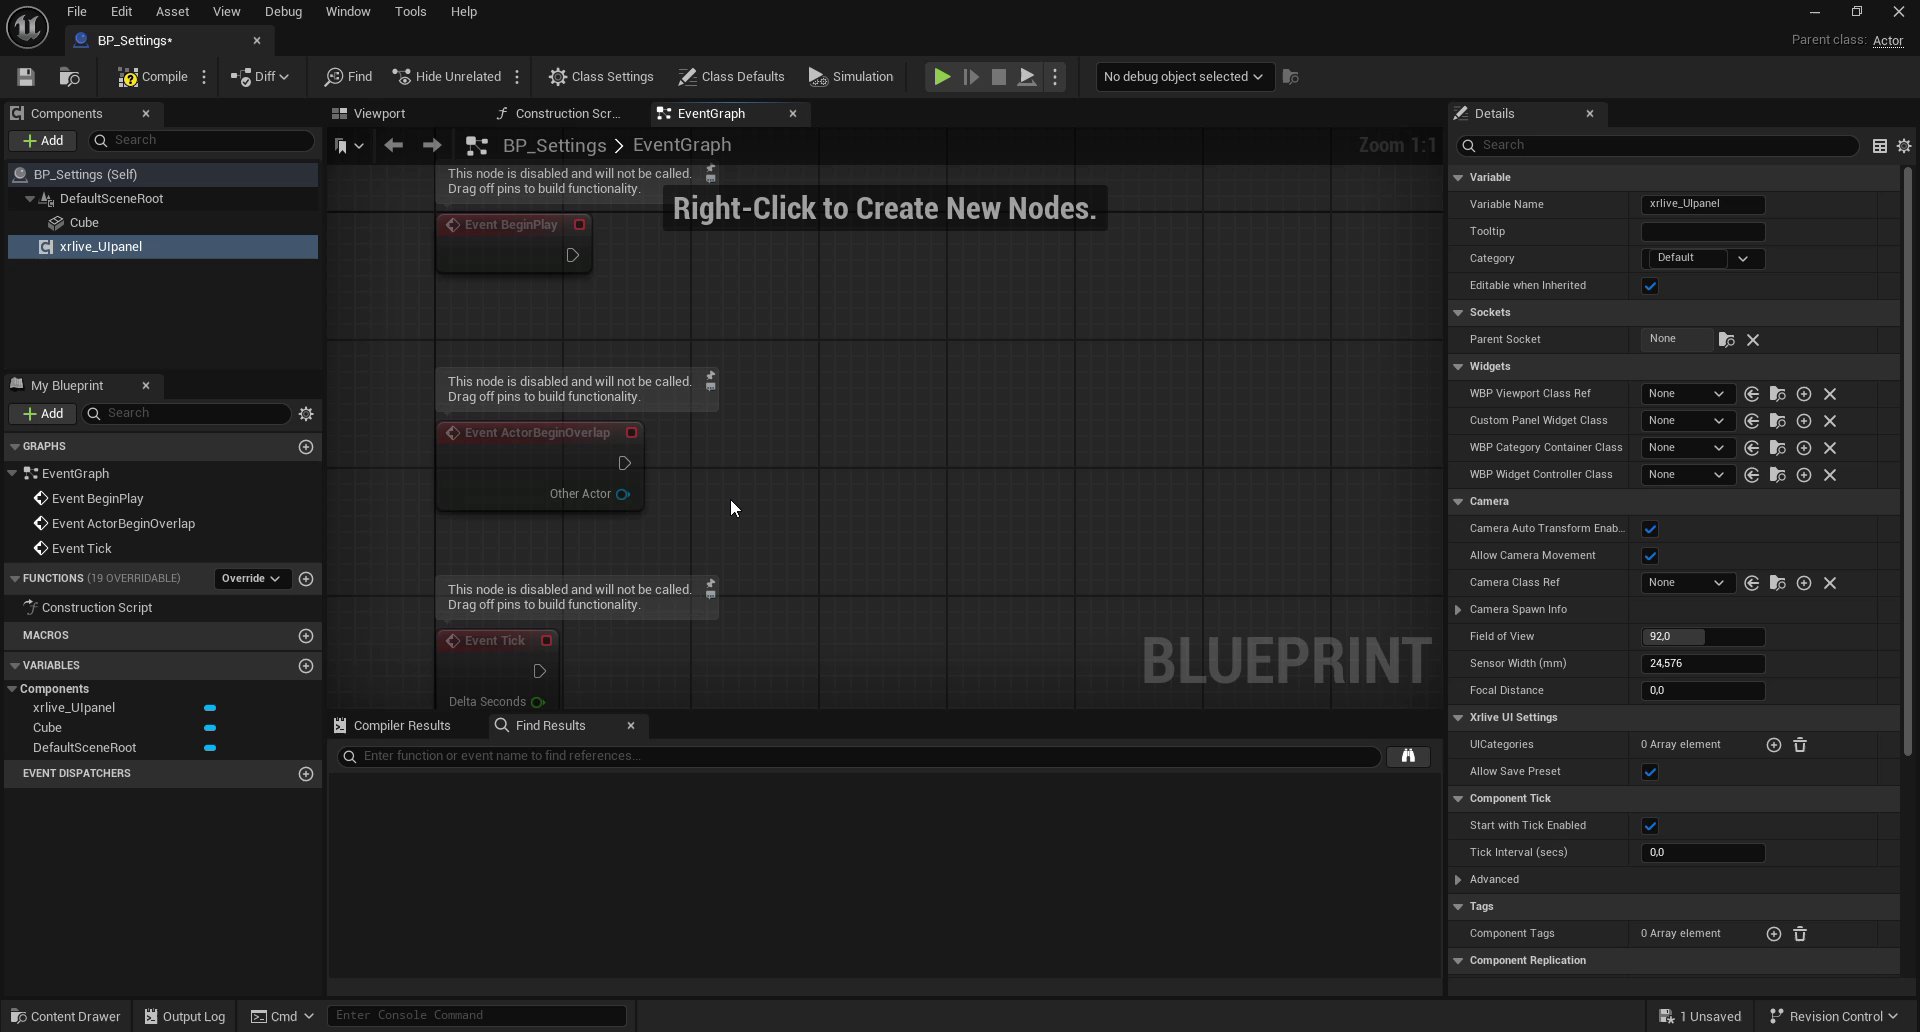
With `xrlive_UIpanel` selected in the Components panel, look at the **Details** panel on the right — it contains three sections that configure how your visual connects to the xRLive system.
The Cube is the shape the operator will control. Its transform, color, and visibility will all be driven by operator controls in later modules.
## 3. Add the xrlive\_UIpanel component
Still in the **Components** panel, click **+ Add** again and search for `xrlive_UIpanel`. Select it to add it to the actor.
With `xrlive_UIpanel` selected in the Components panel, look at the **Details** panel on the right — it contains three sections that configure how your visual connects to the xRLive system.
 ***
## Widgets section
The **Widgets** section sets the four widget classes that xRLive instantiates when your visual runs. Each class reference has a specific role:
| Field | Class to assign | Purpose |
| -------------------------------- | -------------------------- | --------------------------------------------------------------------------------------------------------------------------------- |
| **MBP Viewport Class Ref** | `xRLive_Viewport` | Visual replica of the game window. Renders [xRLive alert widgets](/sdk/alert/overview) and any custom widgets your visual builds. |
| **Custom Panel Widget Class** | `xRLive_CustomPanel` | General container for all operator controls. This is the widget that constructs the entire operator control system. |
| **MBP Category Container Class** | `xRLive_CategoryContainer` | Container that organizes operator controls into categories inside the operator panel. |
| **MBP Widget Controller Class** | `xRLive_WidgetController` | Controller widget for individual control elements: Slider, Button, Color Picker, Checkbox, Dropdown, Text Box, and Back Button. |
Set each field by clicking its dropdown and selecting the corresponding class.
***
## Widgets section
The **Widgets** section sets the four widget classes that xRLive instantiates when your visual runs. Each class reference has a specific role:
| Field | Class to assign | Purpose |
| -------------------------------- | -------------------------- | --------------------------------------------------------------------------------------------------------------------------------- |
| **MBP Viewport Class Ref** | `xRLive_Viewport` | Visual replica of the game window. Renders [xRLive alert widgets](/sdk/alert/overview) and any custom widgets your visual builds. |
| **Custom Panel Widget Class** | `xRLive_CustomPanel` | General container for all operator controls. This is the widget that constructs the entire operator control system. |
| **MBP Category Container Class** | `xRLive_CategoryContainer` | Container that organizes operator controls into categories inside the operator panel. |
| **MBP Widget Controller Class** | `xRLive_WidgetController` | Controller widget for individual control elements: Slider, Button, Color Picker, Checkbox, Dropdown, Text Box, and Back Button. |
Set each field by clicking its dropdown and selecting the corresponding class.
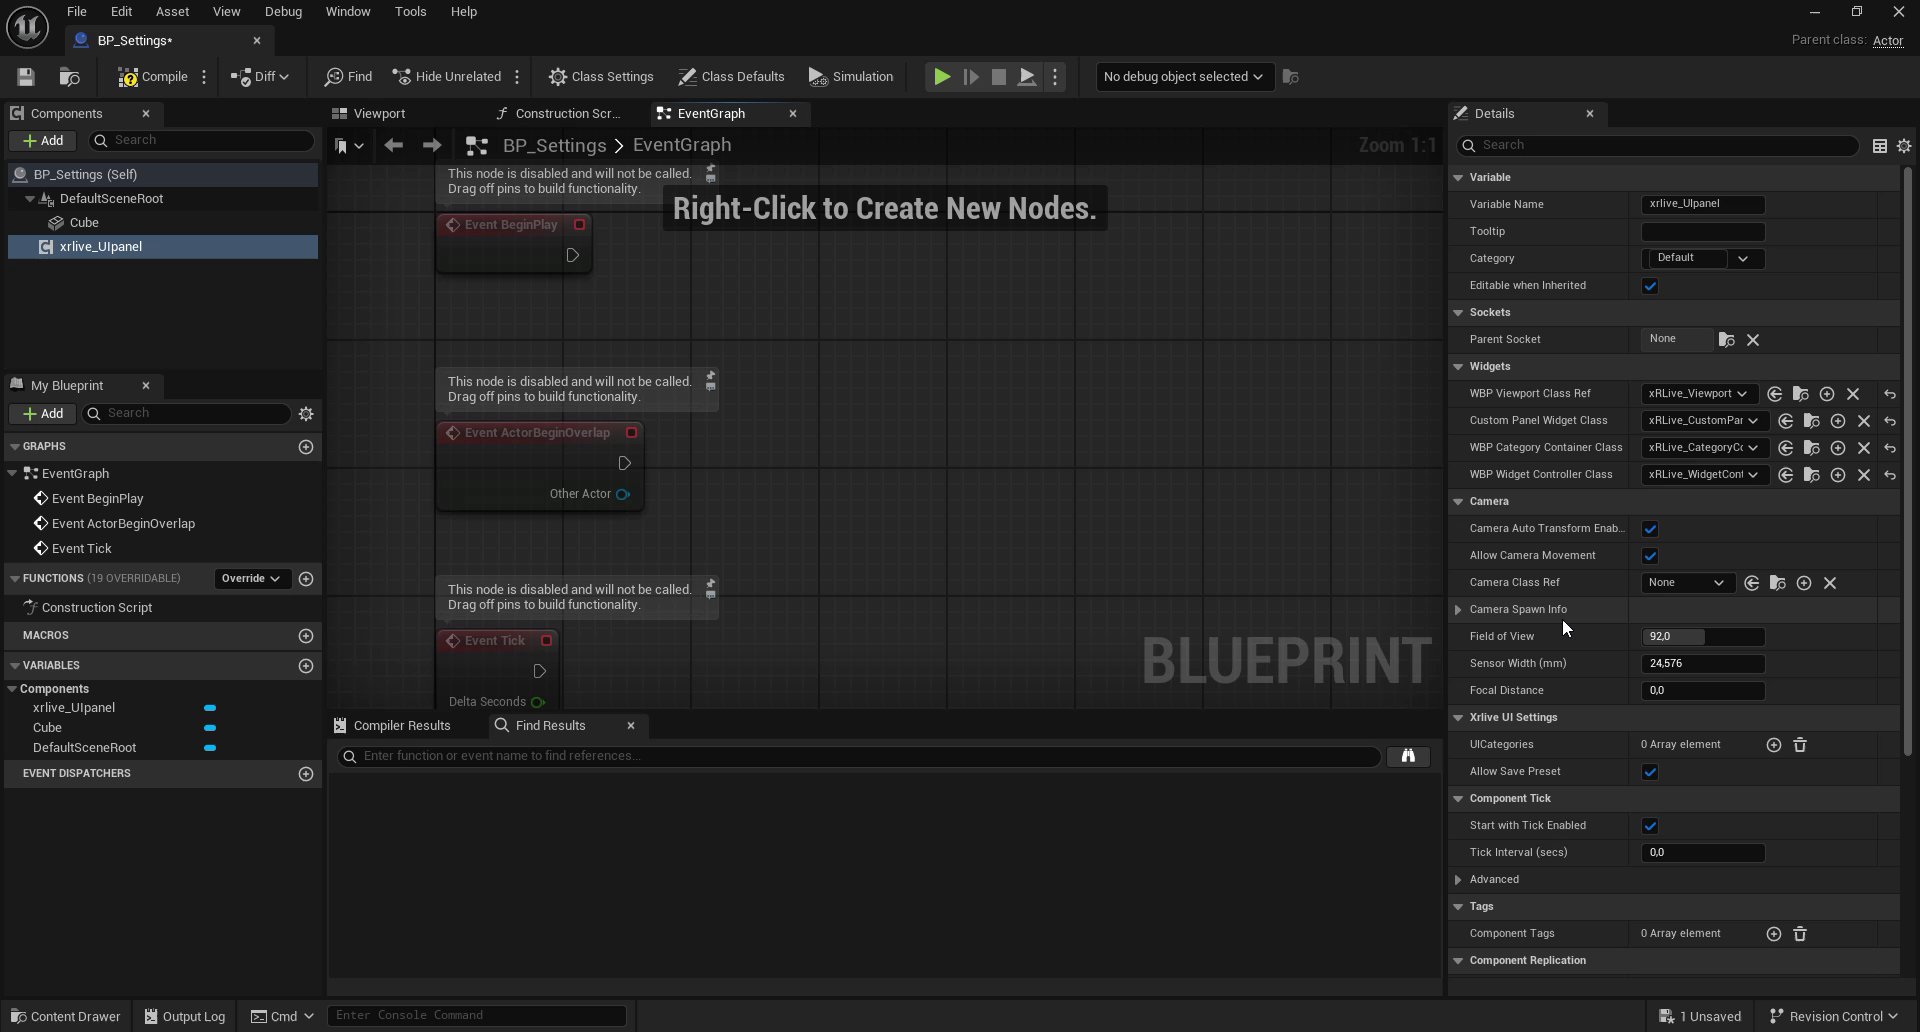 When testing inside the Unreal editor, the **Viewport widget** and the **CustomPanel widget** both render in the game window without separation — all widgets share the same game viewport. If the Viewport widget visually overlaps the operator panel, you can configure a key toggle to control its visibility at runtime. This is covered in [Test in the Editor](/sdk/first-visual/test-in-editor).
***
## Camera section
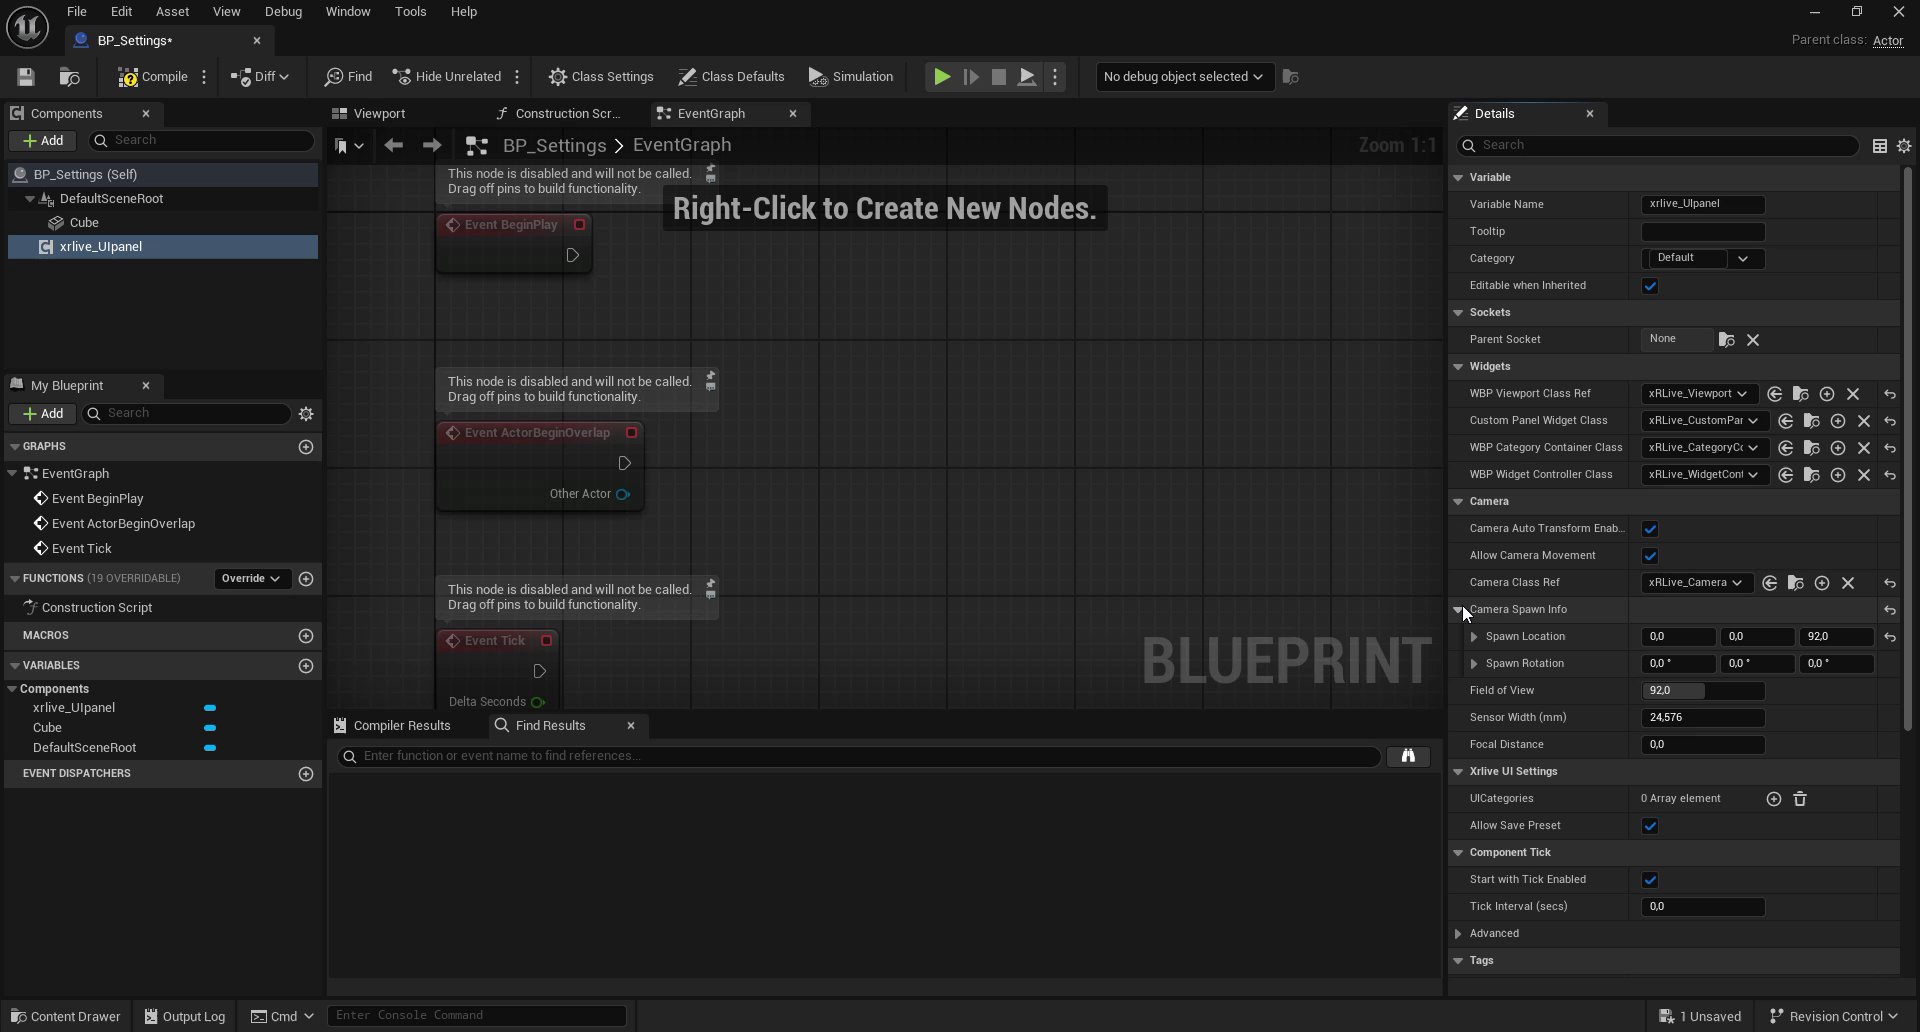
The **Camera** section configures the xRLive camera actor that the system uses to correctly render viewport-based features.
| Field | Value / Description |
| --------------------------------- | ---------------------------------------------------------------------------------------------------------------------------------------------------------------------- |
| **Camera Auto Transform Enabled** | When enabled, the camera's position and rotation are automatically saved in the preset JSON each session. Disable this for visuals that manage their own camera state. |
| **Allow Camera Movement** | Enables or disables operator control over camera movement. Disable for visuals with a fixed camera or when the camera transform is fully driven by operator controls. |
| **Camera Class Ref** | Set this to `xRLive_Camera`. This is the pawn xRLive possesses to render viewport content correctly. |
| **Camera Spawn Info** | The initial position and rotation of the camera. Set **Spawn Location** to `0, 0, 92` to place the camera at a standard operator eye height. |
| **Field of View** | Adjusts the camera lens angle. Default is `92.0`. |
| **Sensor Width (mm)** | Physical sensor width for lens simulation. Default is `24.576`. |
| **Focal Distance** | Distance at which the lens focuses. Default is `0.0` (no depth-of-field effect). |
You can also adjust FOV, Sensor Width, and Focal Distance at runtime from Blueprint using the **Apply Camera Settings** node. See [Camera Settings](/sdk/utilities/camera-settings) for the full reference.
When testing inside the Unreal editor, the **Viewport widget** and the **CustomPanel widget** both render in the game window without separation — all widgets share the same game viewport. If the Viewport widget visually overlaps the operator panel, you can configure a key toggle to control its visibility at runtime. This is covered in [Test in the Editor](/sdk/first-visual/test-in-editor).
***
## Camera section
The **Camera** section configures the xRLive camera actor that the system uses to correctly render viewport-based features.
| Field | Value / Description |
| --------------------------------- | ---------------------------------------------------------------------------------------------------------------------------------------------------------------------- |
| **Camera Auto Transform Enabled** | When enabled, the camera's position and rotation are automatically saved in the preset JSON each session. Disable this for visuals that manage their own camera state. |
| **Allow Camera Movement** | Enables or disables operator control over camera movement. Disable for visuals with a fixed camera or when the camera transform is fully driven by operator controls. |
| **Camera Class Ref** | Set this to `xRLive_Camera`. This is the pawn xRLive possesses to render viewport content correctly. |
| **Camera Spawn Info** | The initial position and rotation of the camera. Set **Spawn Location** to `0, 0, 92` to place the camera at a standard operator eye height. |
| **Field of View** | Adjusts the camera lens angle. Default is `92.0`. |
| **Sensor Width (mm)** | Physical sensor width for lens simulation. Default is `24.576`. |
| **Focal Distance** | Distance at which the lens focuses. Default is `0.0` (no depth-of-field effect). |
You can also adjust FOV, Sensor Width, and Focal Distance at runtime from Blueprint using the **Apply Camera Settings** node. See [Camera Settings](/sdk/utilities/camera-settings) for the full reference.
 ***
## Xrlive UI Settings section
The **Xrlive UI Settings** section has two responsibilities:
* **UICategories** — this array is where you declare the operator control categories and their controls. It is empty for now; you will fill it in the next module (**Define the Control List**).
* **Allow Save Preset** — when enabled, xRLive builds and saves a JSON preset file for this visual after each session. Disable this for visuals that do not use the preset system, such as gameshows or Audience visuals that manage their own state independently.
Leave **Allow Save Preset** enabled for this tutorial. The shape visual uses presets to remember operator control positions between sessions.
***
## What you have now
`BP_Settings` is fully configured with:
* A **Cube** Static Mesh component that the operator controls will manipulate
* An **xrlive\_UIpanel** component with all four widget class references assigned, the `xRLive_Camera` actor class set, the camera positioned at `0, 0, 92`, and preset saving enabled
In the next module you will declare the operator control categories and controls inside **UICategories**.
Declare the movement and shape control categories inside UICategories.
***
## Xrlive UI Settings section
The **Xrlive UI Settings** section has two responsibilities:
* **UICategories** — this array is where you declare the operator control categories and their controls. It is empty for now; you will fill it in the next module (**Define the Control List**).
* **Allow Save Preset** — when enabled, xRLive builds and saves a JSON preset file for this visual after each session. Disable this for visuals that do not use the preset system, such as gameshows or Audience visuals that manage their own state independently.
Leave **Allow Save Preset** enabled for this tutorial. The shape visual uses presets to remember operator control positions between sessions.
***
## What you have now
`BP_Settings` is fully configured with:
* A **Cube** Static Mesh component that the operator controls will manipulate
* An **xrlive\_UIpanel** component with all four widget class references assigned, the `xRLive_Camera` actor class set, the camera positioned at `0, 0, 92`, and preset saving enabled
In the next module you will declare the operator control categories and controls inside **UICategories**.
Declare the movement and shape control categories inside UICategories.